
This tutorial explains how you can draw the 8 lanes skirt.
Go on top of the screen to 'File > Save' and save the document. Write on a piece of paper (or your mobile phone note app) at which step you stopped. This prevents having to puzzle the next time you continue with this tutorial.
Step 1:Go to File > New.
Fill in:
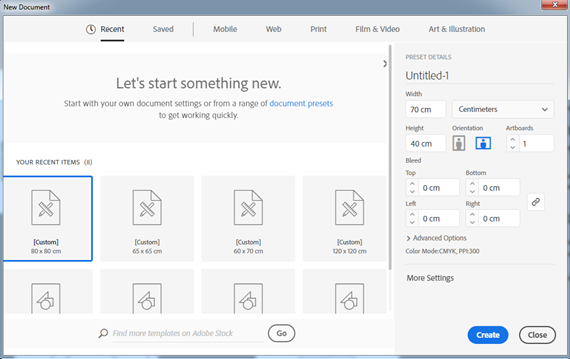
To have a better view:
Step 2: Activate the 'Line Segment Tool ![]() (\).
(\).
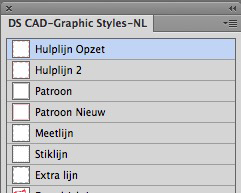
 Step 3: Click in the panel called 'DS CAD-Graphic Styles-En' on "Construction Line".
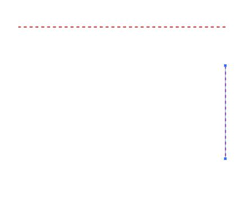
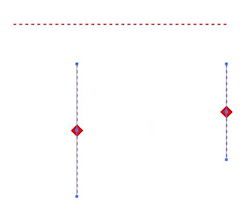
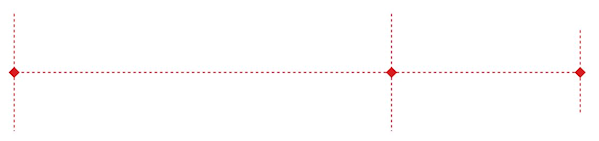
 Step 4: Right click in the center of the artboard and fill in:
 Step 5: Click on the horizontal guide path and fill in:
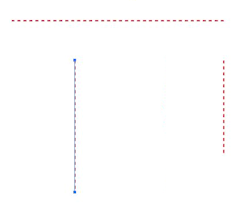
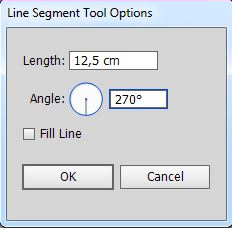 Step 6: Click left from the vertical guide path and fill in:
Step 7: Activate the "Group Selection Tool" ![]() (Q).
(Q).
Step 8: Press and hold 'Shift' and click on the right verticle guide path to add it to the selection.
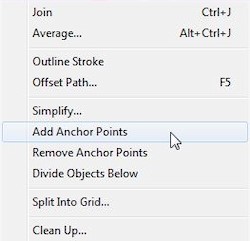 Step 9: On top of the screen go to 'Object - Path - Add Anchor Points'.
Exactly halfway both paths, new anchor points are added.
Step 10: Deselect (Ctrl-Shift-A).
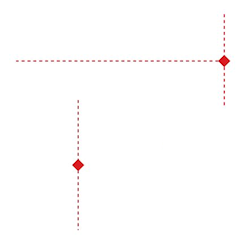
Step 11: On the right vertical guide path, click on the center anchor point, press and hold the mouse and drag the path to the right anchor point from the horizontal guide path. Then release the mouse.
 Step 12: On the left vertical guide path, click on the center anchor point, press and hold the mouse and drag the path to the left anchor point from the horizontal guide path. Then release the mouse.
Step 13: Keep the path selected.
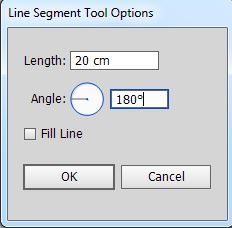
 Step 14: Press 'Enter' and fill in:
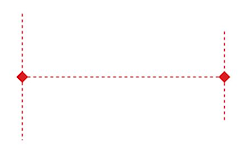
Step 15: Activate the 'Line Segment Tool ![]() (\), on the left vertical guide path, click on the center anchor point and drag the mouse to the left anchor point from the horizontal guide path.
(\), on the left vertical guide path, click on the center anchor point and drag the mouse to the left anchor point from the horizontal guide path.
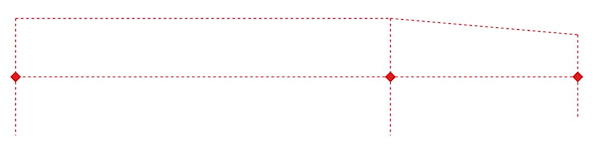
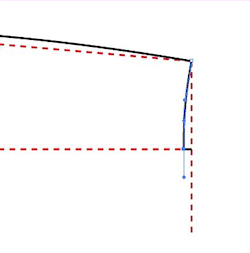
Step 16: Click on the top anchor point from the left vertical guide path and drag to the top anchor point from the center vertical guide path.
Step 17: Deselect (Ctrl-Shift-A).
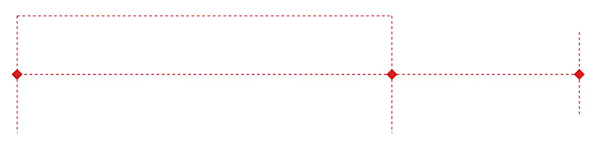
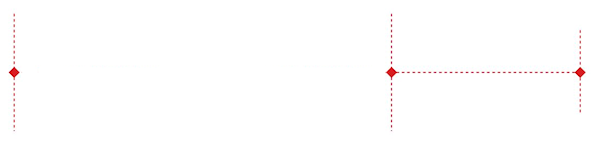
Step 18: Click on the top anchor point from the center vertical guide path and drag to the top anchor piont from the right vertical guide path.
Step 19: Click on the left vertical guide path, press and hold 'Shift' and click on the top horizontal guide path to add it to the selection.
 Step 20: Click in the panel called 'DS CAD-Graphic Styles-En' on "Pattern".
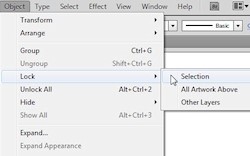
Step 21: Click and drag a rectangle over all hip paths to select them. Then on top of the screen choose 'Object - Lock - Selection' (Ctrl+2).

Step 22: Activate the "Pen Tool" ![]() (P).
(P).
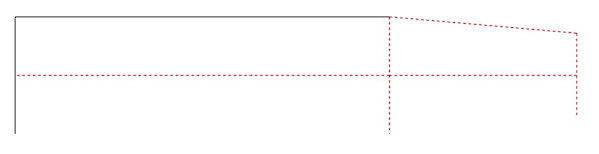
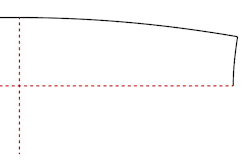
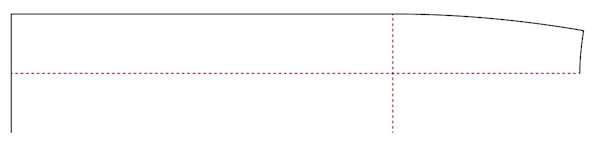
Step 23: To draw the curve:
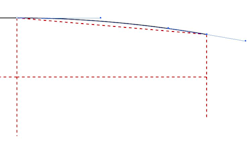 Click on the right anchor point from the horizontal black path, drag a handle to the right and release the mouse.
When you did not manage to create a nice curve, simply Undo (Ctrl-Z) and try it again.
Step 24: Activate the 'Line Segment Tool ![]() (\).
(\).
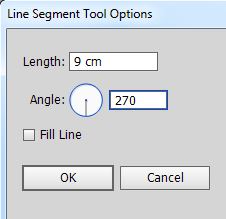
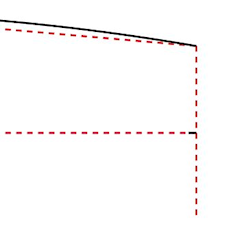
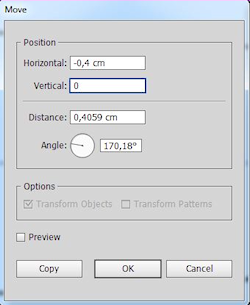
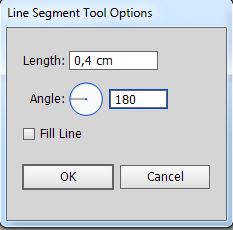 Step 25: Click on the right anchor point from the bottom horizontal red guide path. Press 'Enter' and fill in:
Step 26: Activate the "Group Selection Tool" ![]() (Q).
(Q).
Step 27: Press and hold 'Shift' and click on the top curved black path to add it to the selection.
Step 28: On top of the screen choose 'Object - Lock - Selection (Ctrl+2).
Step 29: Activate the "Pen Tool" ![]() (P).
(P).
Step 30: To draw the next curved path:
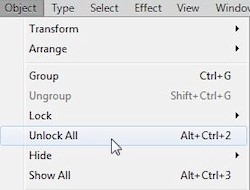
Step 31: On top of the screen choose 'Object - Unlock All' (Alt+Ctrl+2).
Step 32: Deselect (Ctrl-Shift-A).
When you installed, the 'DS Actions' function keys, you can also press 'F8' to carry out both two steps at once.
Step 33: Activate the "Group Selection Tool" ![]() (Q), and click on the top diagonal red guide path to select it.
(Q), and click on the top diagonal red guide path to select it.

Step 34: Press and hold 'Shift' and click on the right verticle red guide path and click on the short horizontal black path to add it to the selection. Then press 'Backspace' to remove the selected paths.
Step 35: Activate the 'Direct Selection Tool' ![]() (A).
(A).
 Step 36: To select the horizontal red guide, click and drag across the path, then click on the right anchor point. Press 'Enter' and fill in:
Step 37: Activate the "Group Selection Tool" ![]() (Q).
(Q).
Step 38: Click on the left vertical black path, then on top of the screen choose 'Object - Lock - Selection' (Ctrl+2).
Step 39: Click on the horizontal black path and on top of the screen choose 'Select - Same Stoke Color'. All black path that were nog locked are selected now.
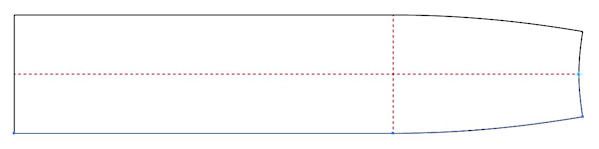
Step 40: Press and hold the 'Rotate Tool' and choose the 'Reflect Tool'  (O).
(O).
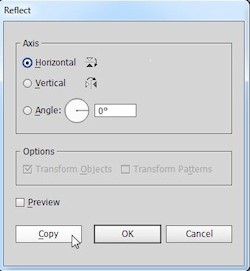
Step 41: Press and hold 'Alt' and click on the bottom anchor point from the right vertical curved black path. A panel opens:
Step 42: Activate the "Group Selection Tool" ![]() (Q).
(Q).
Step 43: Click and drag a rectangle over the crossing from the red guide paths to select all red paths.
 Step 44: Click in the panel called 'DS CAD-Graphic Styles-En' on 'Measure Line'.
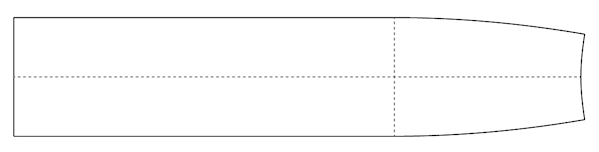
Congratulations! You just created the 8 lanes skirt.
____________________________________________
In deze tutorial wordt je uitgelegd hoe je een rechte 8-baans rok kan tekenen.
Tussentijds stoppen? Voorkom verlies van je werk!
Ga bovenaan naar "Bestand > Opslaan Als.." en bewaar het document. Schrijf op een papiertje (of in je fancy Android / Apple apparaat) bij welke stap je was gebleven en voorkom dat je de volgende keer moet gaan puzzelen!
Stap 1: Ga naar Bestand > Nieuw.
Vul in:
Wil je het beter kunnen zien:
Stap 2: Activeer het gereedschap "Lijnsegment" ![]() (\).
(\).
Stap 3: Klik met je muis bij " DS CAD-Graphic Styles NL" op "Hulplijn Opzet".
Stap 4: Klik rechts in het midden van het tekengebied en vul in:
Stap 5: Klik onder de horizontale hulplijn en vul in:
Stap 6: Klik links van de verticale hulplijn en vul in:
Stap 7: Activeer het gereedschap "Groep selecteren" ![]() (Q).
(Q).
Stap 8: Houd de 'Shift' toets ingedrukt, klik op de rechter vericale hulplijn om aan de selectie toe te voegen.
Stap 9: Kies in de bovenbalk "Object - Paden - Ankerpunten Toevoegen".
Nu zijn er precies op de helft van de lijnen een ankerpunt geplaatst.
Stap 10: Deselecteer (Ctrl-Shift-A).
Stap 11: Klik op het middelste ankerpunt van de rechter verticale hulplijn, houd de muisknop ingedrukt en sleep de lijn naar het rechter ankerpunt van de horizontale hulplijn. Laat de muisknop los.
Stap 12: Klik op het middelste ankerpunt van de linker verticale hulplijn, houd de muisknop ingedrukt en sleep de lijn naar het linker ankerpunt van de horizontale hulplijn. Laat de muisknop los.
Stap 13: En laat de lijn geselecteerd.
Stap 14: Druk op 'Enter' en vul in:
Stap 15: Activeer het gereedschap "Lijnsegment" ![]() (\), klik op het middelste ankerpunt van linker vericale hulplijn en sleep je muis naar het linker ankerpunt van de horizontale hulplijn.
(\), klik op het middelste ankerpunt van linker vericale hulplijn en sleep je muis naar het linker ankerpunt van de horizontale hulplijn.
Stap 16: Klik op het bovenste ankerpunt van de linker verticale hulplijn en sleep met je muis naar het bovenste ankerpunt van de middelste verticale hulplijn.
Stap 17: Deselecteer (Ctrl-Shift-A).
Stap 18: Klik op het bovenste ankerpunt van de middelste verticale hulplijn en sleep je muis naar het bovenste ankerpunt van de rechter verticale hulplijn.
Stap 19: Klik op de linker verticale hulplijn, houd de 'Shift' toets ingedrukt en klik op de bovenste horizontale hulplijn om aan de selectie toe te voegen.

Stap 20: Klik met je muis bij "DS CAD-Graphic Styles NL" op "Patroon".
Stap 21: Selecteer het heupgedeelte door met je muis een rechthoek over alle lijnen te slepen en kies uit de bovenbalk "Object - Vergrendelen - Selectie" (Ctrl+2).
Stap 22: Activeer het gereedschap "Pen" ![]() (P).
(P).
Stap 23: Om deze bocht te tekenen:
Klik op het rechter ankerpunt van de horizontale zwarte lijn, en sleep een handle naar rechts en laat de muis los.Lukt het niet gelijk een mooie ronding te maken maak dan de laatste bewerkingen ongedaan door twee keer (Ctrl-Z) in te drukken en probeer het opnieuw.
Stap 24: Activeer het gereedschap "Lijnsegment" ![]() (\).
(\).
Stap 25: Klik met je muis op het rechter ankerpunt van de onderste horizontale rode hulplijn. Druk op 'Enter' en vul in:
Stap 26: Activeer het gereedschap "Groep selecteren" ![]() (Q).
(Q).
Stap 27: Houd de 'Shift' toets ingedrukt en klik op de bovenste gebogen zwarte lijn om aan de selectie toe te voegen.
Stap 28: Kies uit de bovenbalk "Object - Vergrendelen - Selectie" (Ctrl+2).
Stap 29: Activeer het gereedschap "Pen" ![]() (P).
(P).
Stap 30: Om de volgende bocht te tekenen:
Stap 31: Kies in de bovenbalk "Object - Alles ontgrendelen" (Alt+Ctrl+2).
Stap 32: Deselecteer (Ctrl-Shift-A).
'F8' voor deze procedure als je 'DS Actions' hebt geïnstalleerd.
Stap 33: Activeer het gereedschap "Groep selecteren" ![]() (Q) en klik op de bovenste schuine rode hulplijn om te selecteren.
(Q) en klik op de bovenste schuine rode hulplijn om te selecteren.
Stap 34: Houd de 'Shift' toets ingedrukt, klik op de rechter verticale rode hulplijn en klik op het korte horizontale zwarte lijntje om aan de selectie toe te voegen en verwijder deze lijnen door de 'Backspace' toets in te drukken.
Stap 35: Activeer de "Direct selecteren" ![]() (A).
(A).
Stap 36: Selecteer de horizontale rode hulplijn door met je muis dwars over de lijn te slepen en klik op het rechter ankerpunt, druk op 'Enter' en vul in:
Stap 37: Activeer het gereedschap "Groep selecteren" ![]() (Q).
(Q).
Stap 38: Klik op de linker verticale zwarte lijn en kies uit de bovenbalk "Object - Vergrendelen - Selectie" (Ctrl+2).
Stap 39: Klik op de horizontale zwarte lijn en kies in de bovenbalk "Selecteer - Zelfde - Lijnkleur". Alle zwarte lijnen die niet vergrendeld zijn zijn nu geselecteerd.
Stap 40: Houdt het gereedschap "Roteren" ingedrukt en kies dan het gereedschap "Spiegelen" ![]() (O).
(O).
Stap 41: Druk de 'Alt' toets in en klik op het onderste ankerpunt van de rechter verticaal gebogen zwarte lijn. Een venster wordt geopend:
Stap 42: Activeer het gereedschap "Groep selecteren" ![]() (Q).
(Q).
Stap 43: Klik en sleep een rechthoek over de kruising van de rode hulplijnen om alle rode lijnen te selecteren.
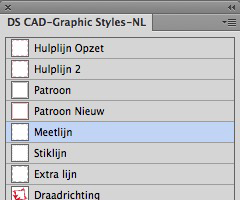 Stap 44: Klik met je muis bij "DS CAD-Graphic Styles-NL" op "Meetlijn".
Gefeliciteerd! Je hebt zojuist het patroon van de rechte 8-baans rok afgerond.