
![]()
We usually teach drawing garments by drawing a complete path with the pen tool in one row without having to make adjustments afterwards. When you are skilled with the pen tool, you will have 100% control. However: drawing the paths fully with the pen is harder to learn.
In the tutorial below you will start to learn to create a garment not by drawing the path fully with the pen tool. In stead you will:
This method is easier to learn. On the other hand, the more complex your drawings will become, the less time saving and less accurate this method will be. This 'bend and join' method is a good way to start learing to create a garment drawing. On the other hand, at the end you also have to master drawing paths completely with the Pen Tool.
This video takes almost ten minutes...
Step 1: Click on the yellow 'Ai' icon to download the Illustrator exercise document and open it in Illustrator.
Step 2: Press 'z' to activate the 'Zoom Tool'  .
.
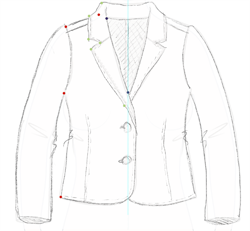 Step 3: Click and drag a marquee over the front jacket to zoom in.
Step 4: Activate the 'Pen Tool' (p)  .
.
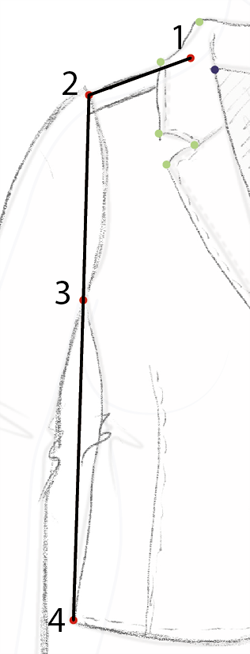 Step 5: Click on the four red dots.
Step 6: Press 'Shift-c'. This will activate the 'Anchor Point Tool'  .
.
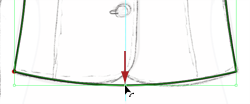
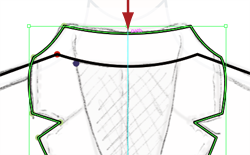
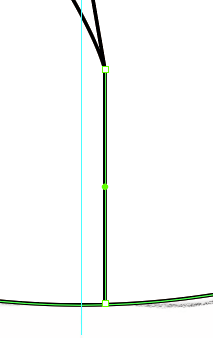
S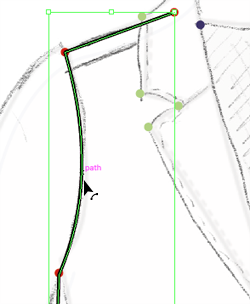 tep 7: Hold the mouse above the armhole seam, click and drag the path right to bend the armhole.
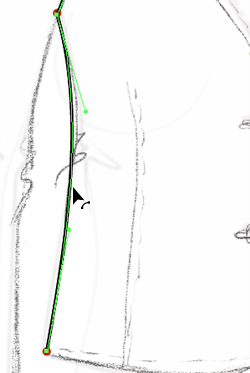 Step 8: Click at waist hight and drag the path right to create the waist curve.
Step 9: Activate the 'Selection Tool' (v)  .
.
Step 10: Click on top of the path.
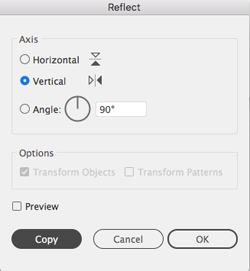
Step 11: Activate the 'Reflect Tool' (o)  .
.
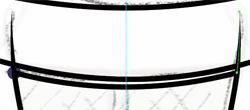
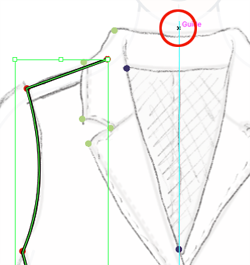 Step 12: Press and hold 'Alt' and click above the garment on the center guide. Then release the 'Alt' key.
 Step 13: Click on 'Copy'.
Step 14: Activate the 'Selection Tool' (v) .
Step 15: Press and hold 'Shift' and click on the left path to add it to the selection.
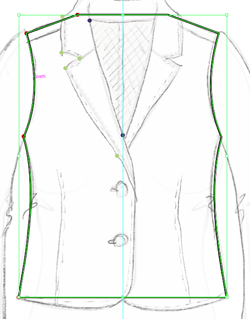 Step 16: Press the shortcut 'Ctrl-J' two times to join the paths.
Step 17: Press the shortcut 'Shift-C' to activate the 'Anchor Point Tool' .
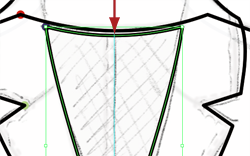
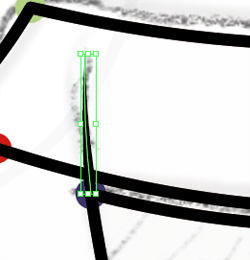
 Step 18: Hold the mouse on top of the path in the top center, then click and drag downwards.
 Step 19: Hold the mouse on the bottom center path, then click and drag downwards.
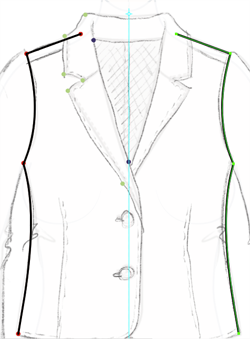
Step 20: Activate the 'Pen Tool' (p) .
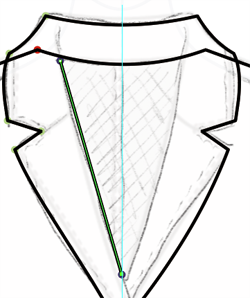
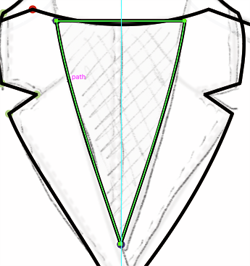
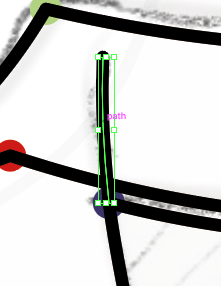
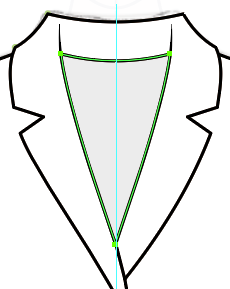
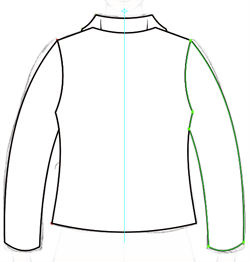
 Step 21: Click on all the green dots to draw the left path of the collar.
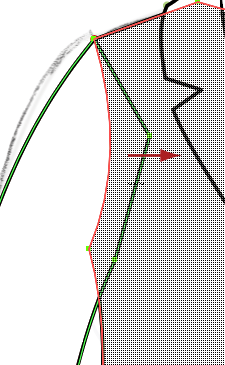
Step 22: Press the shortcut 'Shift-C' to activate the 'Anchor Point Tool' .
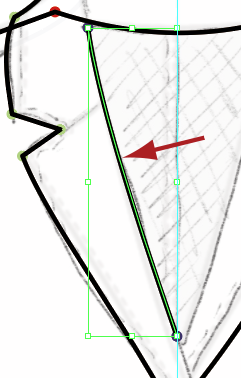
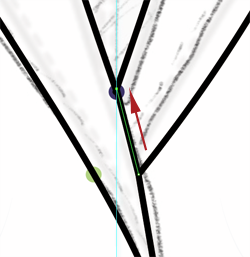
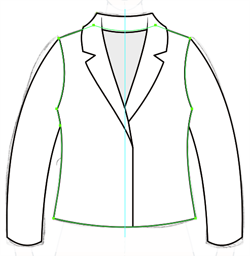
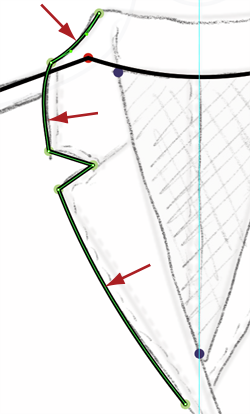 Step 23: Click on the path and drag in the direction of the red arrows (sample image).
Step 24: Activate the 'Selection Tool' (v) .
Step 25: Click on the path you just created.
Step 26: Activate the 'Reflect Tool' (o) .
 Step 27: Press and hold 'Alt' and click above the garment on the center guide.
Step 28: Click on 'Copy'.
Step 29: Activate the 'Selection Tool' (v) .
Step 30: Press and hold 'Shift' and click on the left path to add it to the selection.
 Step 31: Press the shortcut 'Ctrl-J' two times.
Step 32: Activate the 'Direct Selection Tool' (a)  .
.
Step 33: Click on the left bottom anchor point and release the mouse button.
 Step 34: Click and drag the anchor point downwards.
 Step 35: Click on the handle and move it a bit right.
 Step 36: Press the shortcut 'Shift-C' to activate the 'Anchor Point Tool' .
Step 37: Click on the top path, in the center and drag a bit downwards.
Step 38: Activate the 'Pen Tool' (p) .
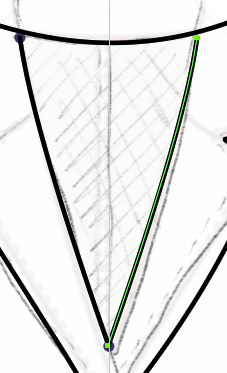
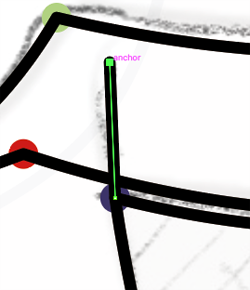
 Step 39: Click on the two blue anchor points.
Step 40: Press the shortcut 'Shift-C' to activate the 'Anchor Point Tool' .
 Step 41: Click on the path and bend it a bit to the left.
Step 42: Activate the 'Selection Tool' (v) .
Step 43: Click on the path you just created.
Step 44: Activate the 'Reflect Tool' (o) .
 Step 45: Press and hold 'Alt' and click above the garment on the center guide.
Step 46: Click on 'Copy'.
Step 47: Activate the 'Selection Tool' (v) .
 Step 48: Press and hold 'Shift' and click on the left path to add it to the selection.
Step 49: Press the shortcut 'Ctrl-J' two times.
Step 50: Press the shortcut 'Shift-C' to activate the 'Anchor Point Tool' .
 Step 51: Click on the top path and bend it a bit downwards.
Step 52: Activate the 'Line Segment Tool' (/)  .
.
 Step 53: Click and hold the mouse and drag to create a path that closes the open gap as per sample image.
 Step 54: Click and drag a short path as per sample image.
Step 55: Press the shortcut 'Shift-C' to activate the 'Anchor Point Tool' .
 Step 56: Click on the path and bend it a bit left.
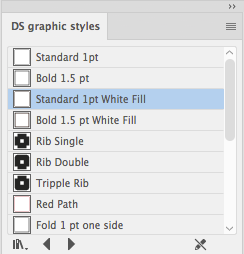
 Step 57: Inside the panel 'DS graphic styles', click on 'Fold 1 pt one side'.
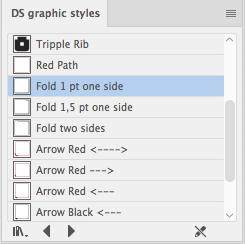
When you don't have the 'DS graphic styles' installed, then
 Open 'Window > Properties'
You can click on the link 'Install the 'DS Libraries' at the bottom of this page to download the 'DS graphic styles' and read how to install the library.
Step 58: Activate the 'Selection Tool' (v) .
Step 59: Click on the path you just created.
Step 60: Activate the 'Reflect Tool' (o) .
Step 61: Press and hold 'Alt' and click above the garment on the center guide.
 Step 62: Click on 'Copy'.
Step 63: Activate the 'Selection Tool' (v) .
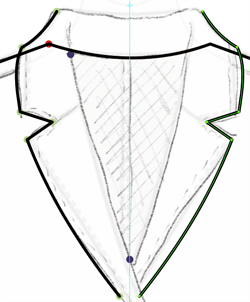
 Step 64: Press and hold 'Shift' and click on the path of the jacket and the collar (see red circles in the sample image).
Step 65: Inside the panel 'DS graphic styles', click on 'Standard 1pt White Fill'.
Or manually fill the paths with white.
If you accidently colored the stroke white, then press 'Ctrl-z' and press the 'x' key and try again. Pressing the 'x' key toggles between fill and stroke.
Step 66: Click on the path of the inner shape.
 Step 67: Inside the panel 'DS Swatches', click on one of the gray's.

Or manually create a gray fill...
Step 68: Activate the 'Line Segment Tool' (/) .
 Step 69: Click on the bottom anchor point of the collar, hold the mouse, press and hold 'shift' and drag downwards to draw the closure path.
Step 70: Activate the 'Pen Tool' (p) .
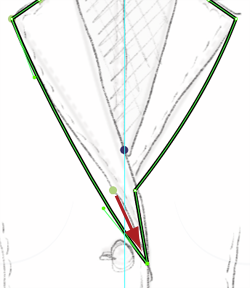
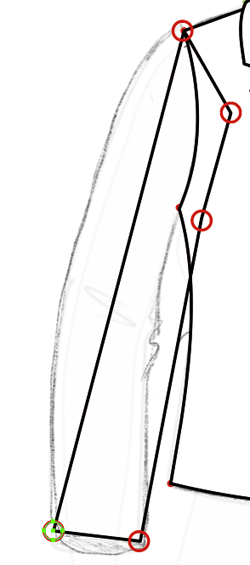 Step 71: Click to place five anchor points to create the sleeve. (on the red circles as per sample image).
Step 72: Press the shortcut 'Shift-C' to activate the 'Anchor Point Tool' .
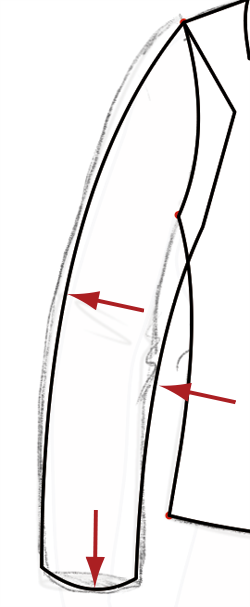 Step 73: Bend three paths as per sample image.
Step 74: Activate the 'Selection Tool' (v) .
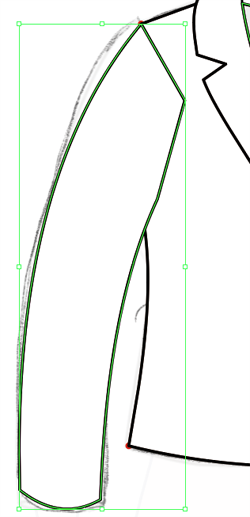 Step 75: Inside the panel 'DS graphic styles', click on 'Standard 1pt White Fill.
Or manually fill the path with white.
If you accidently colored the stroke white, then press 'Ctrl-z' and press the 'x' key and try again. Pressing the 'x' key toggles between fill and stroke.
Step 76: Press and hold 'Shift' and click on the body to add it to the selection.
The sleeve and the body should both be selected...
Step 77: Activate the 'Shape Builder Tool' (Shift-m) 
 Step 78: Click and drag over the path as per sample image.
Step 79: Activate the 'Selection Tool' (v) .
Step 80: Click outside the drawing to 'Deselect' (ctrl-shift-a).
Step 81: Click on the sleeve to select it.
Step 82: Activate the 'Reflect Tool' (o) .
 Step 83: Press and hold 'Alt' and click above the garment on the center guide.
Step 84: Click on 'Copy'.
Step 85: Activate the 'Selection Tool' (v) .
Step 86: Click on the body to select it.
 Step 87: Go on top of the screen to 'Object > Arrange > Send to Back.
Save the drawing for the use in other tutorials...
__________________________________________________
De standaard methode om in Illustrator kleding te tekenen is door met het gereedschap Pen vormen in zijn geheel te tekenen. Zonder dat je de lijn daarna nog hoeft aan te passen. Zodra je deze manier van tekenen beheerst, dan heb je 100% controle over de lijn die je wilt tekenen.
Maar, de bovenstaande methode is ook lastig om te leren. In de tutorial beneden ga je eerst leren om op een eenvoudige manier met het gereedschap Pen punten te plaatsen en deze daarna om te buigen.
De stappen die je dan maakt om een kledingstuk te tekenen zijn als volgt:
. om de lijn te buigen...Deze methode is eenvoudiger om te leren. Aan de andere kant, wat complexere tekeningen zijn op deze manier lastiger te tekenen. Tekeningen krijgen snel onbewust een ietsjes eenvoudigere stijl. Daarom zal je uiteindelijk ook de methode waarbij je lijnen volledig met het gereedschap pen tekent moeten beheersen.
![]()
![]()
Deze video duurt bijna tien minuten...
Stap 1: Klik op het gele 'Ai' icoontje om het oefendocument te downloaden en te openen in Illustrator.
Stap 2: Druk op de 'z' toets om het gereedschap 'Zoom' te activeren.
Stap 3: Klik en sleep een kader om het jasje om er naar toe in te zoomen.
Stap 4: Activeer het gereedschap 'Pen' (p) .
Stap 5: Klik op de vier rode punten.
Stap 6: Druk op 'Shift-c' om het gereedschap 'Ankerpunt' activeren.
Stap 7: Houdt de muis boven de lijn van het armsgat. Klik en sleep naar rechts om het armsgat te buigen.
Stap 8: Klik op de taille en sleep naar rechts om er een bocht in te buigen.
Stap 9: Activeer het gereedschap 'Selecteren' (v) .
Stap 10: Klik op de lijn.
Stap 11: Activeer het gereedschap 'Spiegelen' (o) .
Stap 12: Houdt 'Alt' ingedrukt en klik iets boven het kledingstuk op de midden hulplijn. Laat dan de 'Alt' weer los.
Stap 13: Klik op 'Kopieren'.
Stap 14: Activeer het gereedschap 'Selecteren' (v) .
Stap 15: Houdt 'Shift' ingedrukt en klik op het linker pad om het aan de selectie toe te voegen.
Stap 16: Druk tweemaal op 'Ctrl-J' om de lijnen te verbinden.
Stap 17: Druk op de sneltoets 'Shift-C' om het gereedschap 'Ankerpunt' te activeren .
Stap 18: Houdt de muis boven het middenpad bovenaan. Klik er op en sleep iets omlaag.
Stap 19: Houdt de muis op het midden onder pad. Klik er op en sleep iets omlaag.
Stap 20: Activeer het gereedschap 'Pen' (p) .
Stap 21: Klik op alle groene stippen om het linker pad van de kraag te tekenen.
Stap 22: Druk op de sneltoets 'Shift-C' om het gereedschap 'Ankerpunt' te activeren .
Step 23: Buig het pad op drie plaatsen zoals op de voorbeeld afbeelding.
Stap 24: Activeer het gereedschap 'Selecteren' (v) .
Stap 25: Klik op het pad wat je zojuist hebt gemaakt.
Stap 26: Activeer het gereedschap 'Spiegelen' (o) .
Stap 27: Houdt 'Alt' ingedrukt en klik iets boven het kledingstuk op de midden hulplijn. Laat dan de 'Alt' weer los.
Stap 28: Klik op 'Kopieren'.
Stap 29: Activeer het gereedschap 'Selecteren' (v) .
Stap 30: Houdt 'Shift' ingedrukt en klik op het linker pad om het aan de selectie toe te voegen.
Stap 31: Druk tweemaal op 'Ctrl-J' om de lijnen met elkaar te verbinden.
Stap 32: Activeer het gereedschap 'Direct selecteren'(a) .
Stap 33: Klik op het linker onderstel ankerpunt en laat de muis los.
Stap 34: Klik er opnieuw op en sleep het ankerpunt schuin omlaag.
Stap 35: Klik op het handvat van de hendel en sleep de hendel iets naar rechts.
Stap 36: Druk op de sneltoets 'Shift-C' om het gereedschap 'Ankerpunt' te activeren .
Stap 37: Klik op het bovenste pad in het midden en buig de lijn iets omlaag.
Stap 38: Activeer het gereedschap 'Pen' (p) .
Stap 39: Klik op de twee blauwe ankerpunten.
Stap 40: Druk op de sneltoets 'Shift-C' om het gereedschap 'Ankerpunt' te activeren .
Stap 41: Klik op het pad en buig het iets naar links.
Stap 42: Activeer het gereedschap 'Selecteren' (v) .
Stap 43: Klik op het pad wat je zojuist hebt getekent.
Stap 44: Activeer het gereedschap 'Spiegelen' (o) .
Stap 45: Houdt 'Alt' ingedrukt en klik iets boven het kledingstuk op de midden hulplijn.
Stap 46: Klik op 'Kopieren'.
Stap 47: Activeer het gereedschap 'Selecteren' (v) .
Stap 48: Houdt 'Shift' ingedrukt en klik op het linker pad om het aan de selectie toe te voegen.
Stap 49: Druk tweemaal op 'Ctrl-J' om de lijnen met elkaar te verbinden.
Stap 50: Druk op de sneltoets 'Shift-C' om het gereedschap 'Ankerpunt' te activeren .
Stap 51: Klik op het bovenste horizontale pad van de vorm en sleep iets omlaag.
Stap 52: Activeer het gereedchap 'Lijnsegment' (/) .
Stap 53: Klik en sleep een verbindingslijn in het open gedeelte.
Stap 54: Klik en sleep een klein lijntje in de top van de kraag.
Stap 55: Druk op de sneltoets 'Shift-C' om het gereedschap 'Ankerpunt' te activeren .
Stap 56: Klik op het pad en buig het iets naar links.
Stap 57: In het venster 'DS graphic styles', klik op 'Fold 1 pt one side'.
Wanneer je de 'DS graphic styles' niet hebt geinstalleerd, doe dan het volgende:
Open 'Venster > Eigenschappen'Onderaan deze pagina staat een link 'Install the 'DS Libraries'. Daar kan je heen gaan om de 'DS graphic styles' te downloaden en je leest er hoe je het kan installeren.
Stap 58: Activeer het gereedschap 'Selecteren' (v) .
Stap 59: Klik op de lijn die je net hebt gemaakt.
Stap 60: Activeer het gereedschap 'Spiegelen' (o) .
Stap 61: Houdt 'Alt' ingedrukt en klik iets boven het kledingstuk op de midden hulplijn.
Stap 62: Klik op 'Kopieren'.
Stap 63: Activeer het gereedschap 'Selecteren' (v) .
Stap 64: Houdt 'Shift' ingedrukt en klik op het pad van het jasje en van de kraag om ze beide te selecteren.
Stap 65: In het venster 'DS graphic styles', klik op 'Standard 1pt White Fill'.
Of vul de vormen handmatig met wit.
Wanneer je per ongelijk de lijn wit hebt gemaakt, druk dan op 'Ctrl-z' en druk daarna op de 'x' toets en vul de vormen opnieuw met wit. Door op de 'x' te drukken kan je wisselen tussen 'lijn' en 'vulling'.
Stap 66: Klik op het pad van de binnenste vorm.
Stap 67: In het venster 'DS Swatches', klik op een van de grijze kleuren.
Of vul de vorm handmatig met grijs....
Stap 68: Activeer het gereedschap 'Lijnsegment' (/) .
Stap 69: Klik op het onderste ankerpunt van de kraag, houdt 'Shift' ingedrukt en sleep omlaag om tot aan de onderkant van het jasje.
Stap 70: Activeer het gereedschap 'Pen' (p) .
Stap 71: Plaats vijf ankerpunten door op de in de voorbeeld afbeelding rood omlijnde plekken om de mouw te tekenen.
Stap 72: Druk op de sneltoets 'Shift-C' om het gereedschap 'Ankerpunt' te activeren .
Stap 73: Buig drie lijnen zoals op de voorbeeld afbeelding.
Stap 74: Activeer het gereedschap 'Selecteren' (v) .
Stap 75: In het venster 'DS graphic styles', klik op 'Standard 1pt White Fill.
Of vul de vorm handmatig met wit.
Wanneer je per ongelijk de lijn wit hebt gemaakt, druk dan op 'Ctrl-z' en druk daarna op de 'x' toets en vul de vormen opnieuw met wit.
Stap 76: Houdt 'Shift' ingedrukt en klik op het jasje (body) om het aan de selectie toe te voegen.
De mouw en de body zijn nu beide geselecteerd.
Stap 77: Activeer het gereedschap 'Vormen maken' (Shift-m) .
Stap 78: Beweeg de muis over de overbodige lijn. Klik er links van en sleep over de lijn en laat dan de muis los.
Stap 79: Activeer het gereedschap 'Selecteren' (v) .
Stap 80: Klik naast het kledingstuk om te 'Deselecteren' (ctrl-shift-a).
Stap 81: Klik op de mouw om deze te selecteren.
Stap 82: Activeer het gereedschap 'Spiegelen' (o) .
Stap 83: Houdt 'Alt' ingedrukt en klik iets boven het kledingstuk op de midden hulplijn.
Stap 84: Klik op 'Kopieren'.
Stap 85: Activeer het gereedschap 'Selecteren' (v) .
Stap 86: Klik op de body om deze vorm te selecteren.
Stap 87: Ga bovenaan naar 'Object > Orderen > Naar achtergrond'.
Bewaar de tekening.