In this exercise, we will use artwork that I once created myself. Therefore, it is not a case of plagiarism since the artwork is mine, and I give you permission to do whatever you want with it. In fact, below I will place the original Adobe Illustrator artwork that you can download and view, edit, or do whatever you want with Adobe Illustrator (but that is not the exercise now).
![]()
You don't need to download the Illustrator drawing for this exercise. It's more for yourself if you find it interesting to view or edit the original in Illustrator.
Step 1:
Click on the blue JPG image below to download the JPG exercise document.

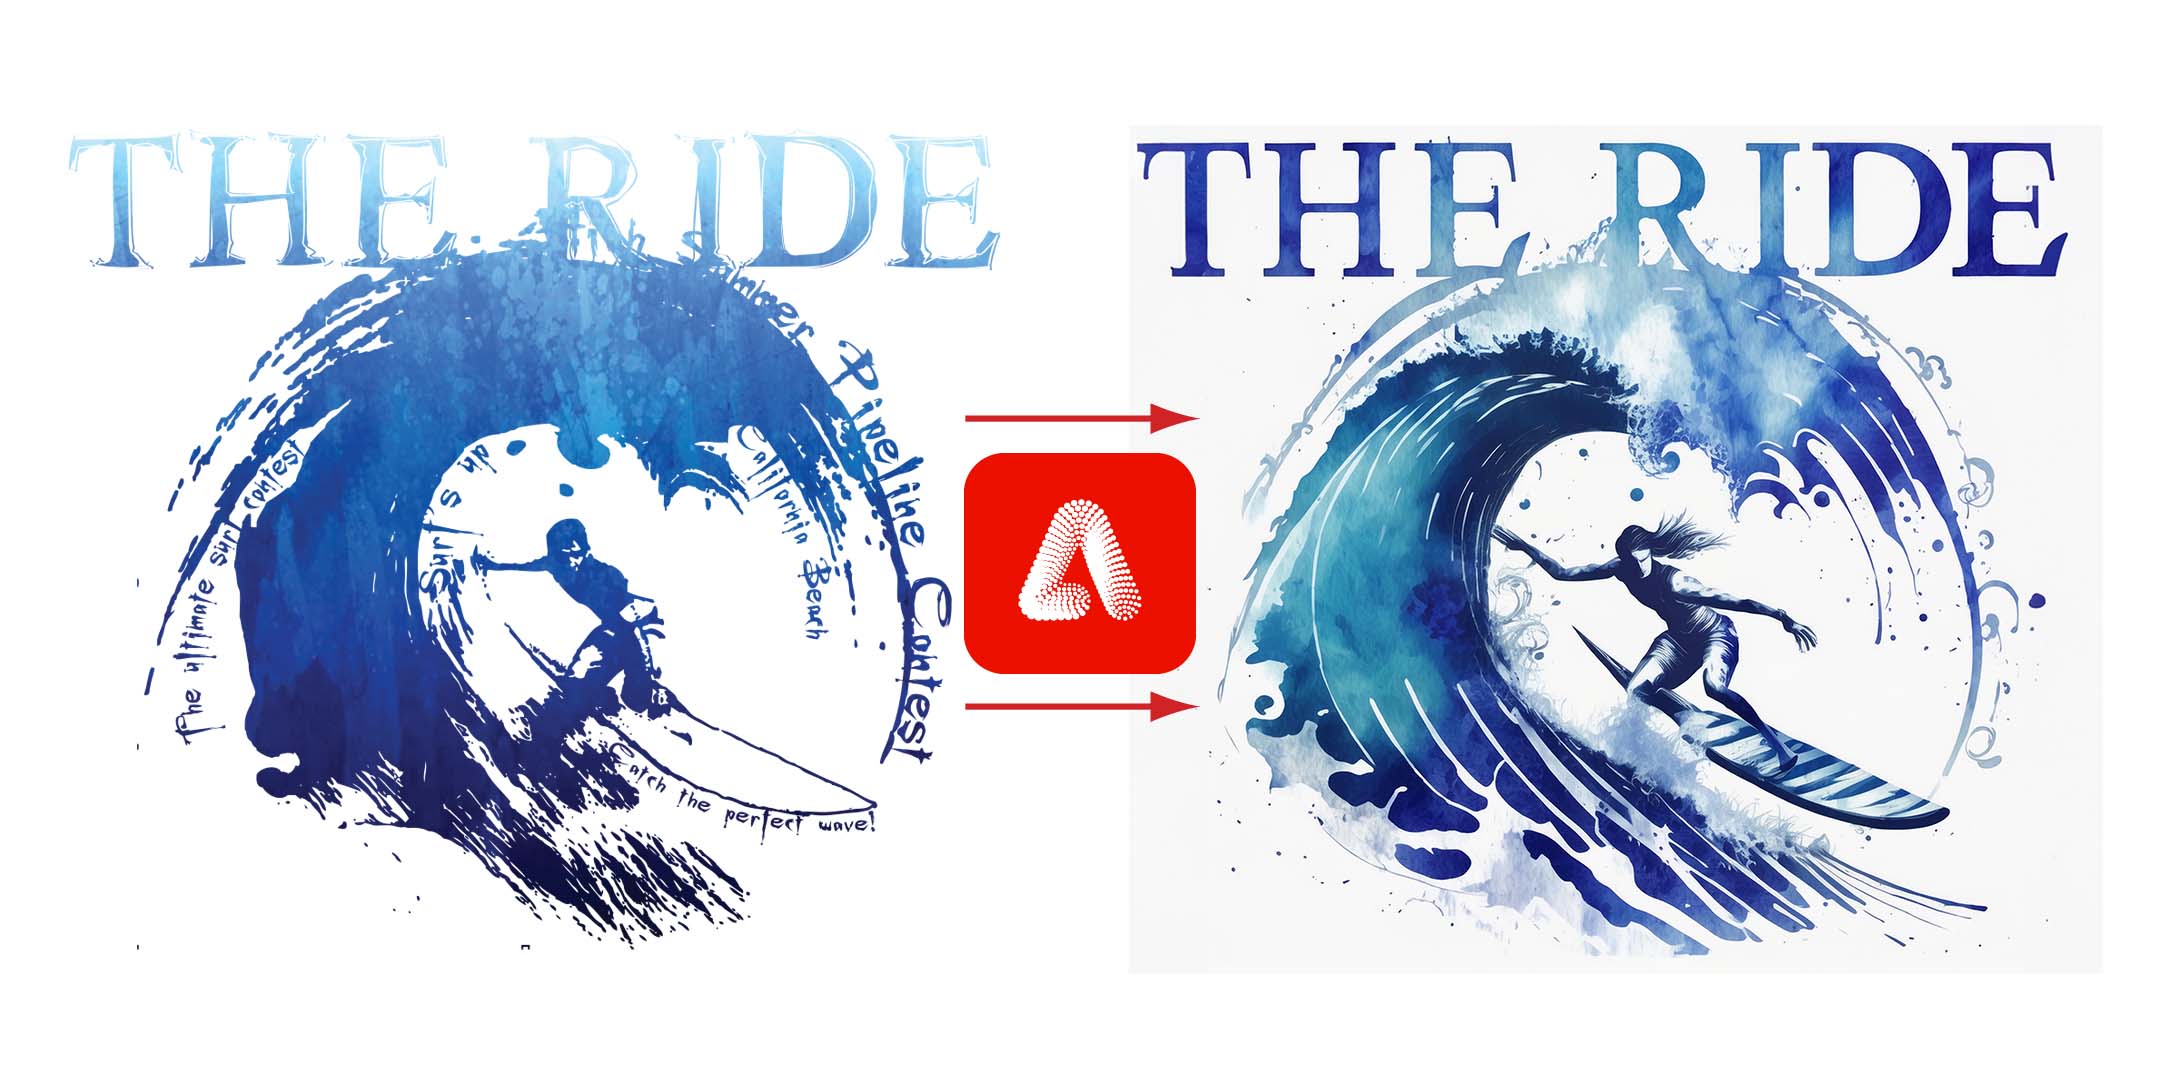
I have intentionally saved this image in low quality, as if you found it on 'Google Images'.

Step 2: Go to https://firefly.adobe.com.
Step 3 When you are on this website, you need to immediately enter a prompt. Enter the following prompt and click on 'Generate':
Blue and white illustration of a surfer on a wave with the text 'The Ride' above.
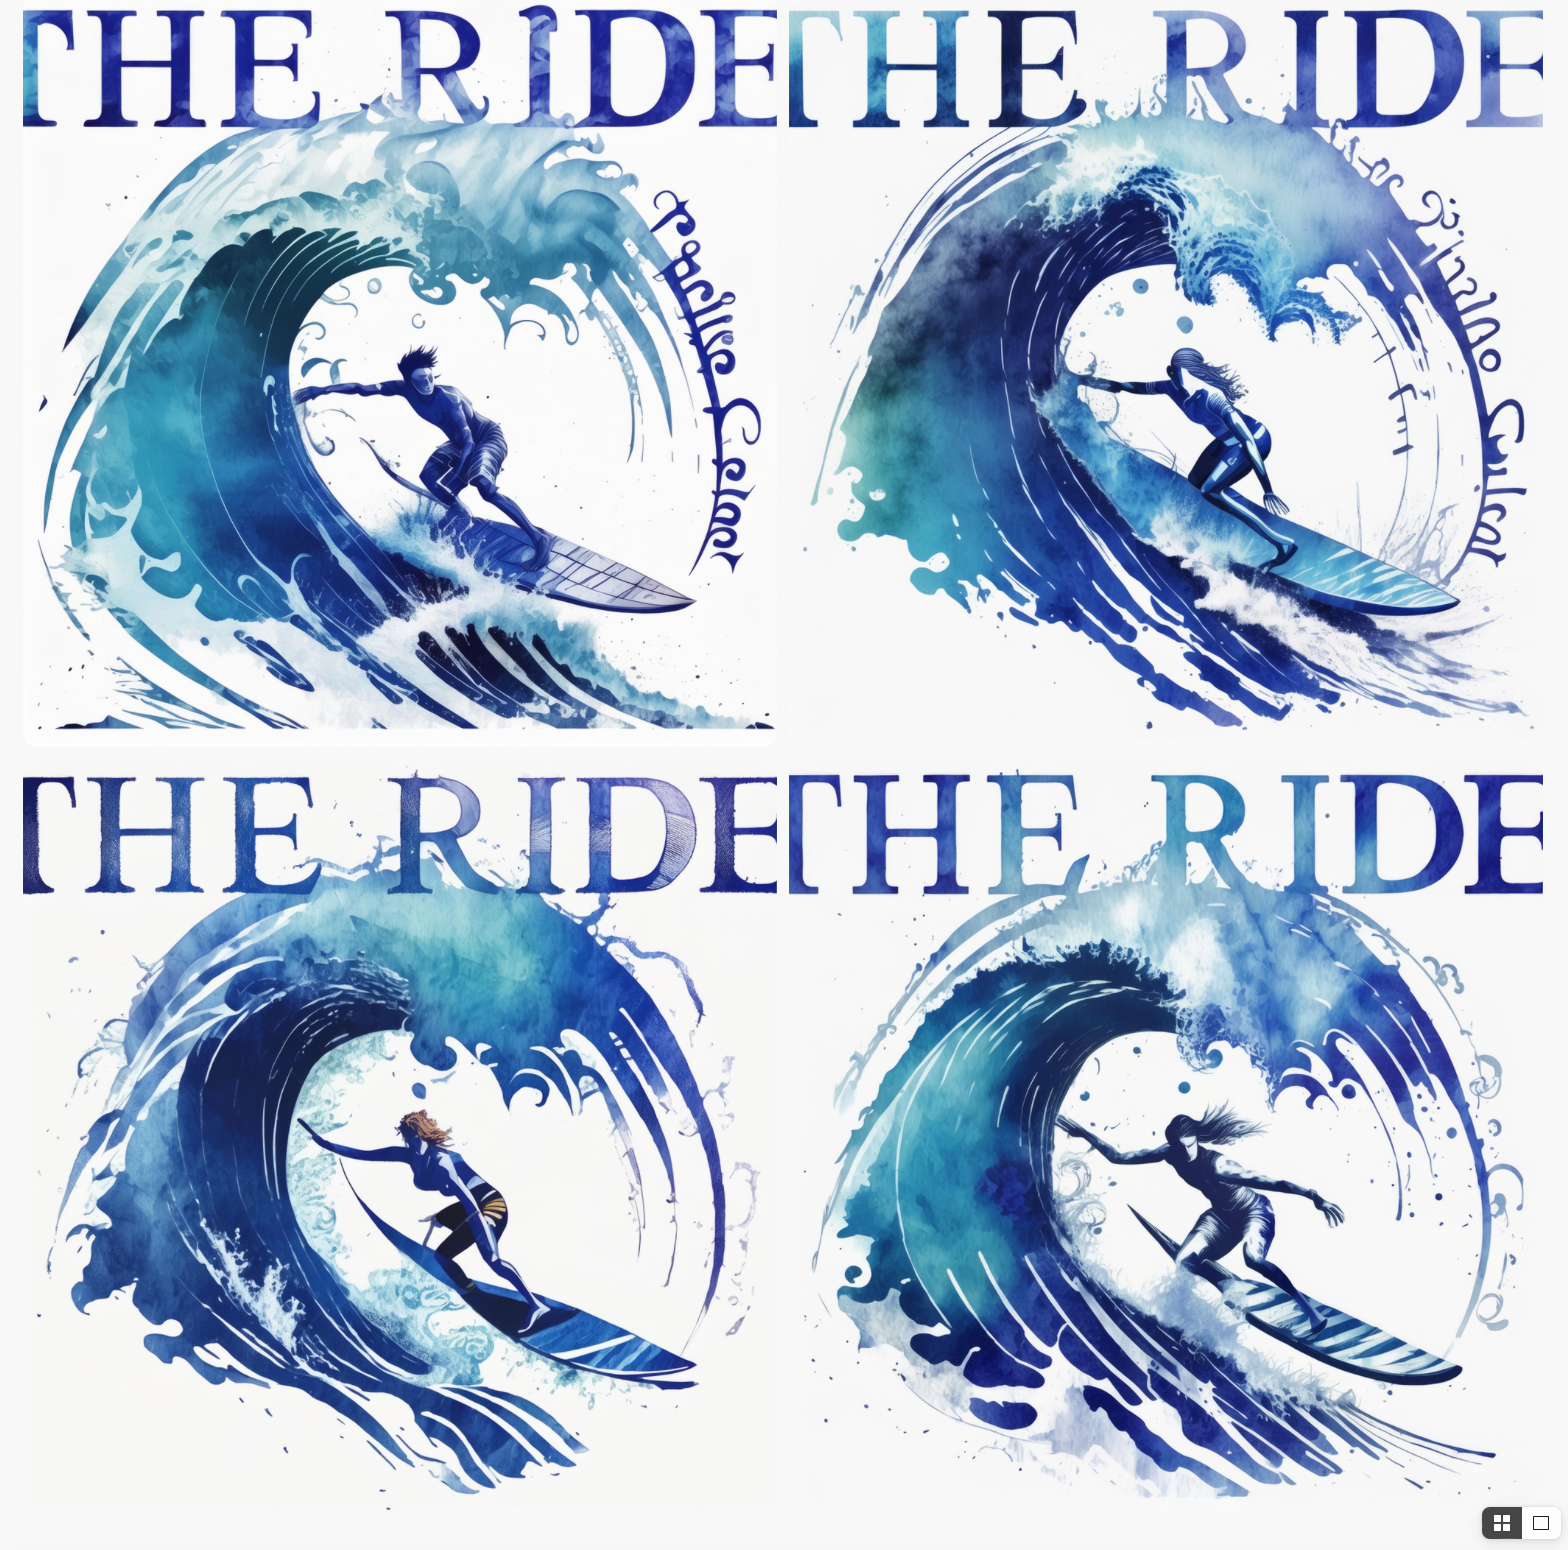
Step 4: The first result is not the final outcome. You are now in the workspace where you can make the necessary adjustments to get what you want.


When I am a few steps further along, I have experienced the difference between 'square' and 'widescreen', and I will first explain why you should choose 'Square' in this case instead of 'Widescreen'.
The results when you choose square or widescreen are significantly different, also in the way Firefly interprets your command. I have tested this multiple times with approximately the same result each time. With 'Square', I get what I want, namely that the text 'THE RIDE' is created, but the text within the wave is not (because it is too small and becomes unreadable characters).
With 'Widescreen', it leaves out the text 'The Ride' and instead attempts to create text within the wave, which does not turn out well.
Step 5: At 'Content Type' choose 'Art'.

Step 6: Now comes an important step: Composition. At 'Composition', Click on 'Upload Image' and choose the JPG image you downloaded at the beginning.

Step 7: Do you want to closely match the original image? Then slide the 'Strength' slider all the way to the right.
Step 8: For Styles, do exactly the same. Upload the same image and move both sliders all the way to the right.

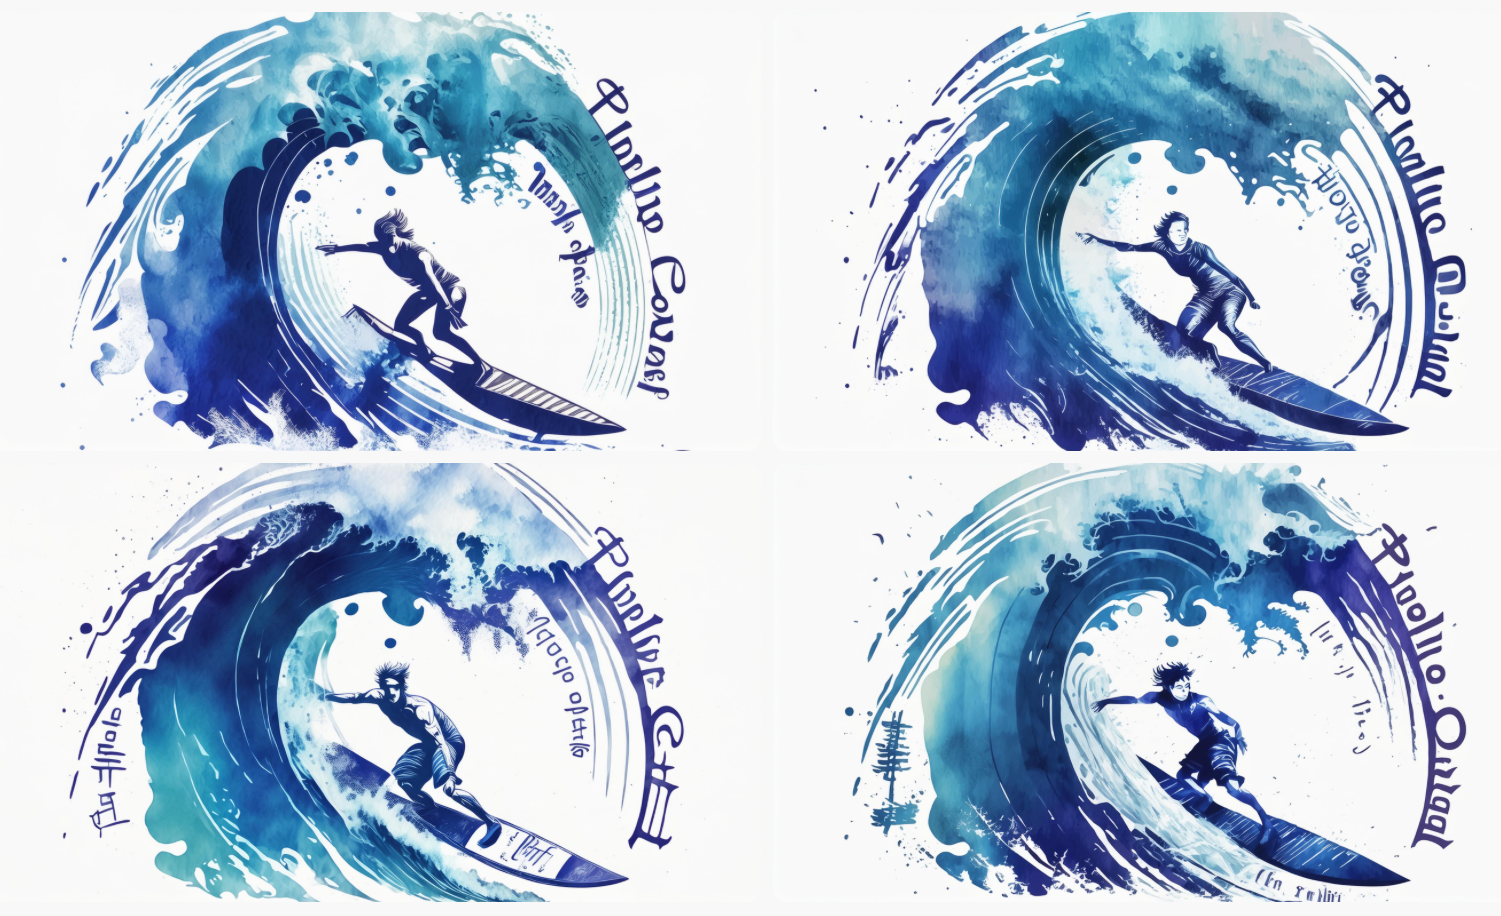
Step 9: The result is such that the text is cut off on the left and right. Firefly tends to create a kind of cropped 'close-up', perhaps intentionally to prevent plagiarism? I have no idea. But when making bags, for example, using a reference drawing, this also happens frequently. In that case, it helps to choose widescreen or portrait. However, Firefly being Firefly, we can solve this quickly and easily, which we will do in the next step.
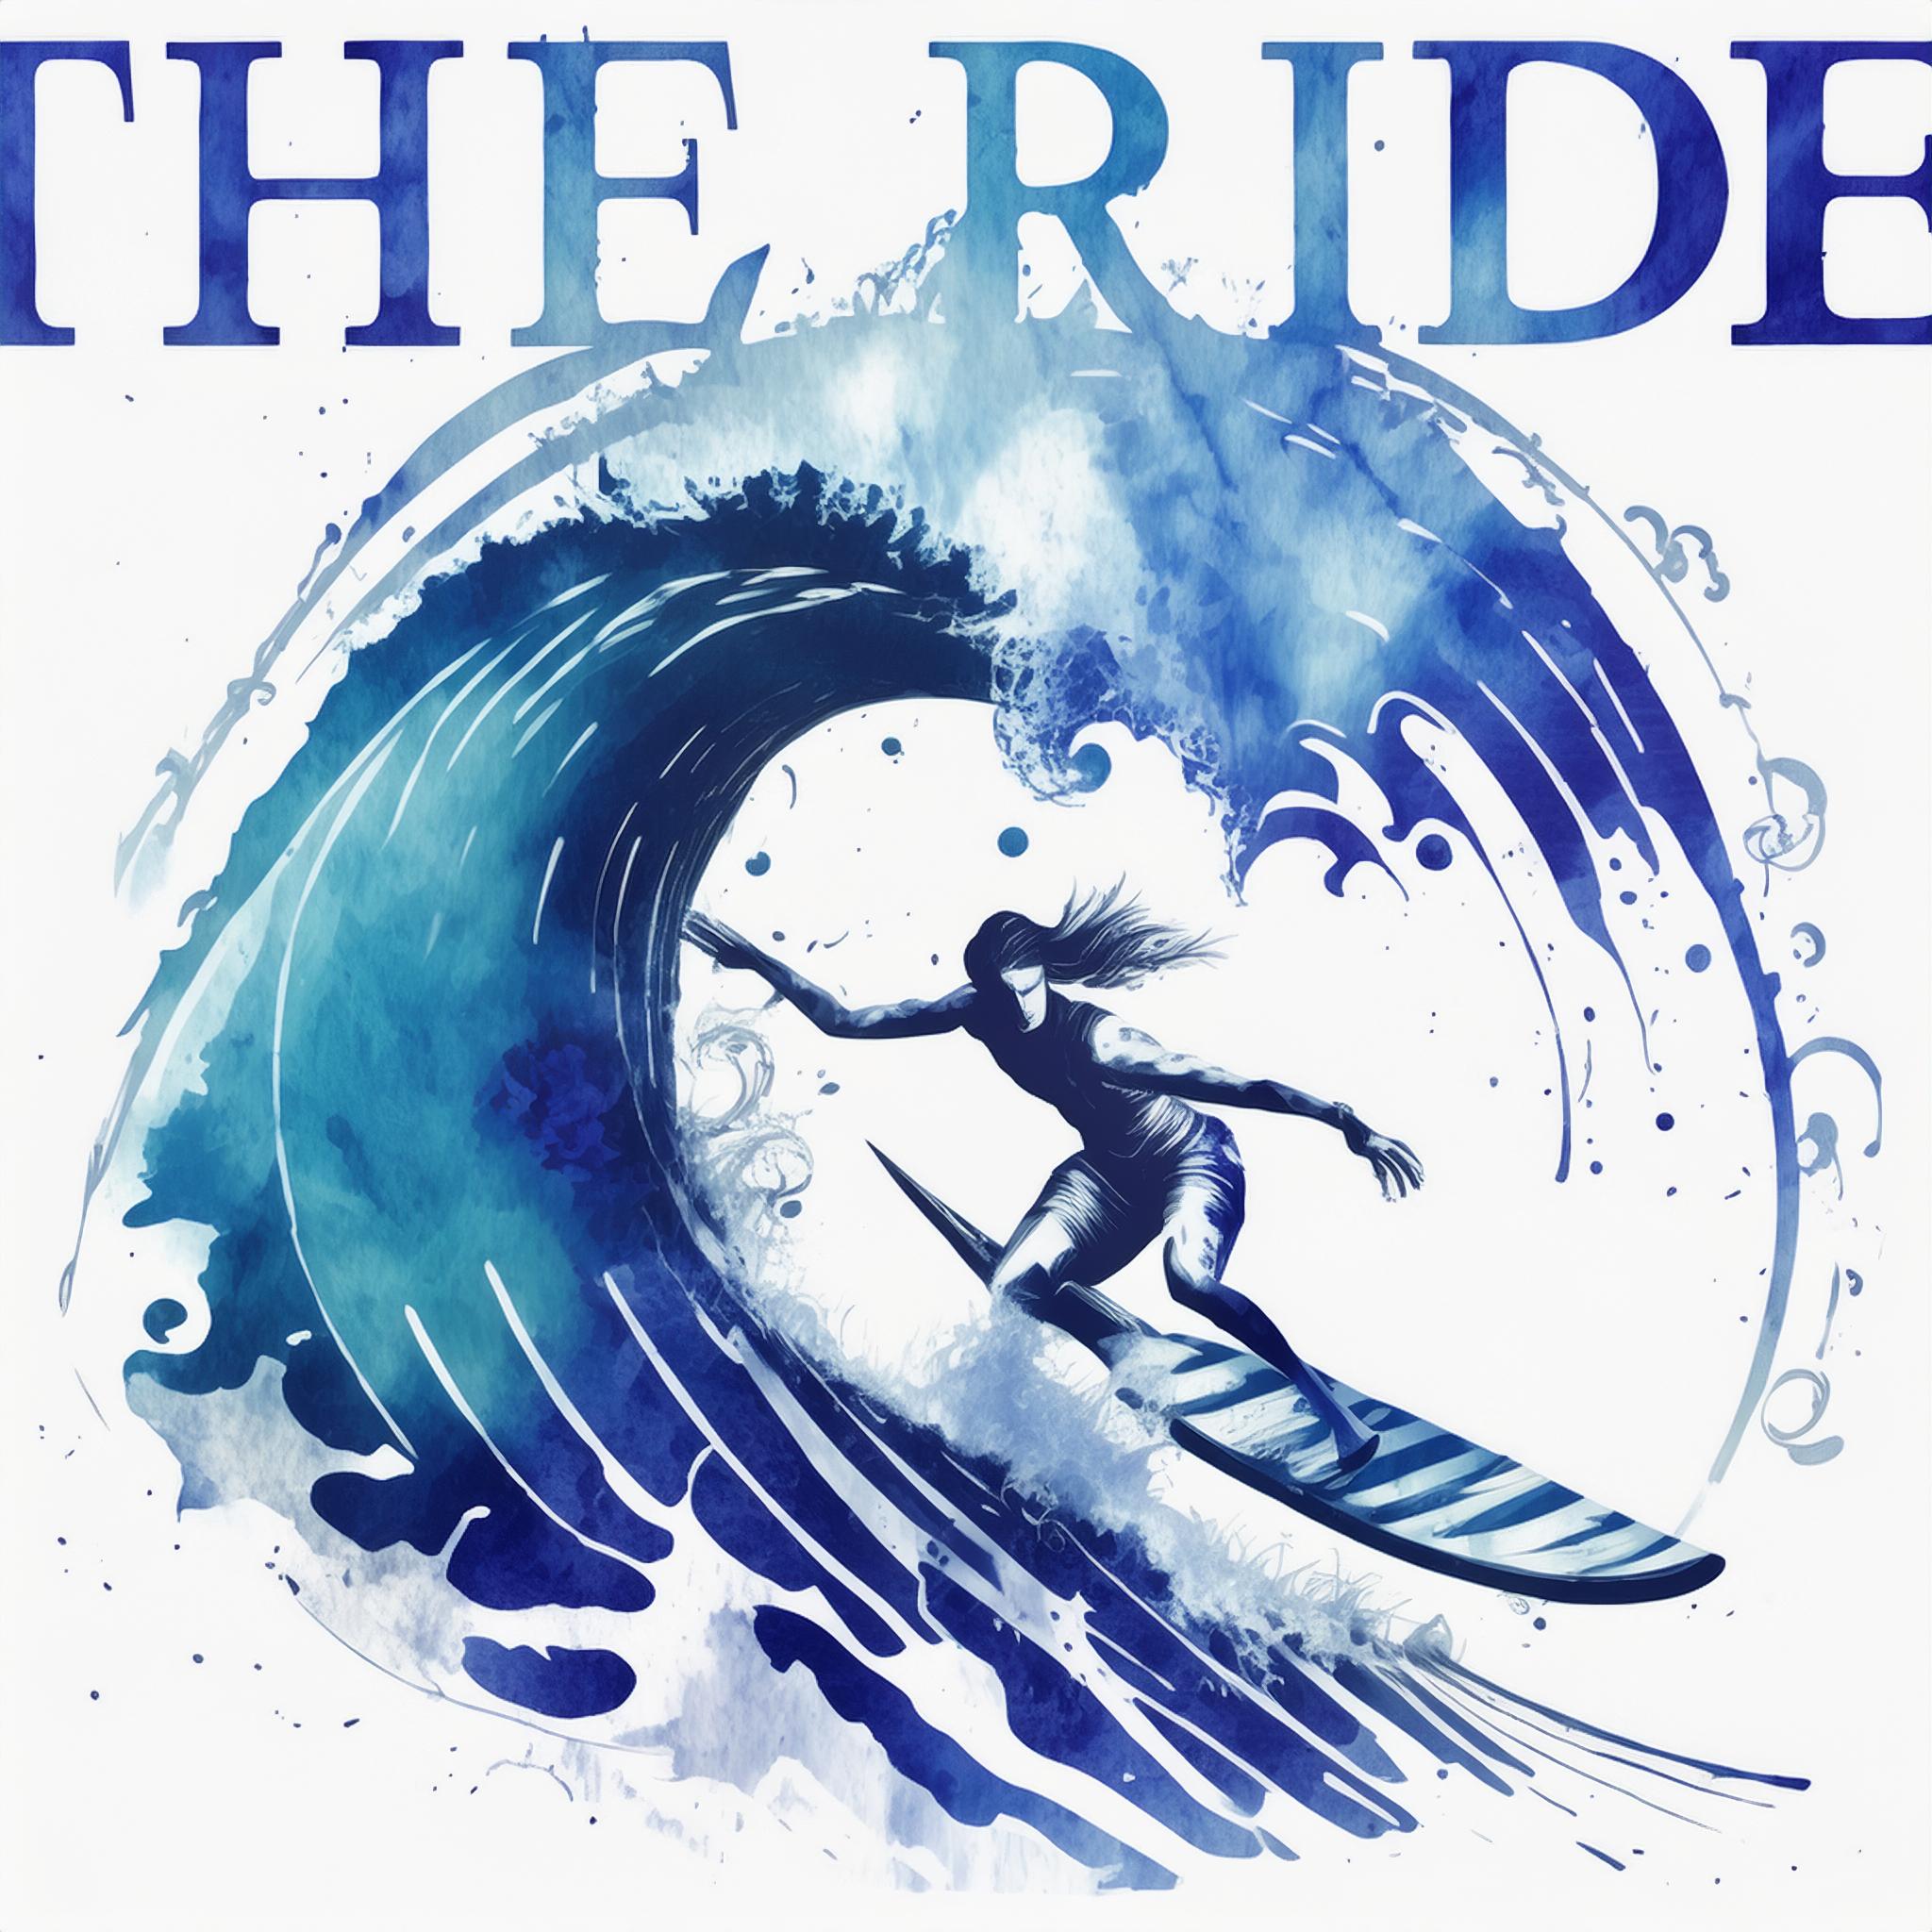
Step 10: Just like in Photoshop where you can 'Generative Expand' with the 'Crop' tool, you can also do this in Firefly. You don't need to go to Photoshop for this. The option is just hidden. You need to first click on 'Edit' in the upper left corner, then choose 'Generative Fill (preview)'.

Step 11: Now you can choose 'Expand' on the left. Click on it, and now you can slightly drag the edges outward on the left and right.
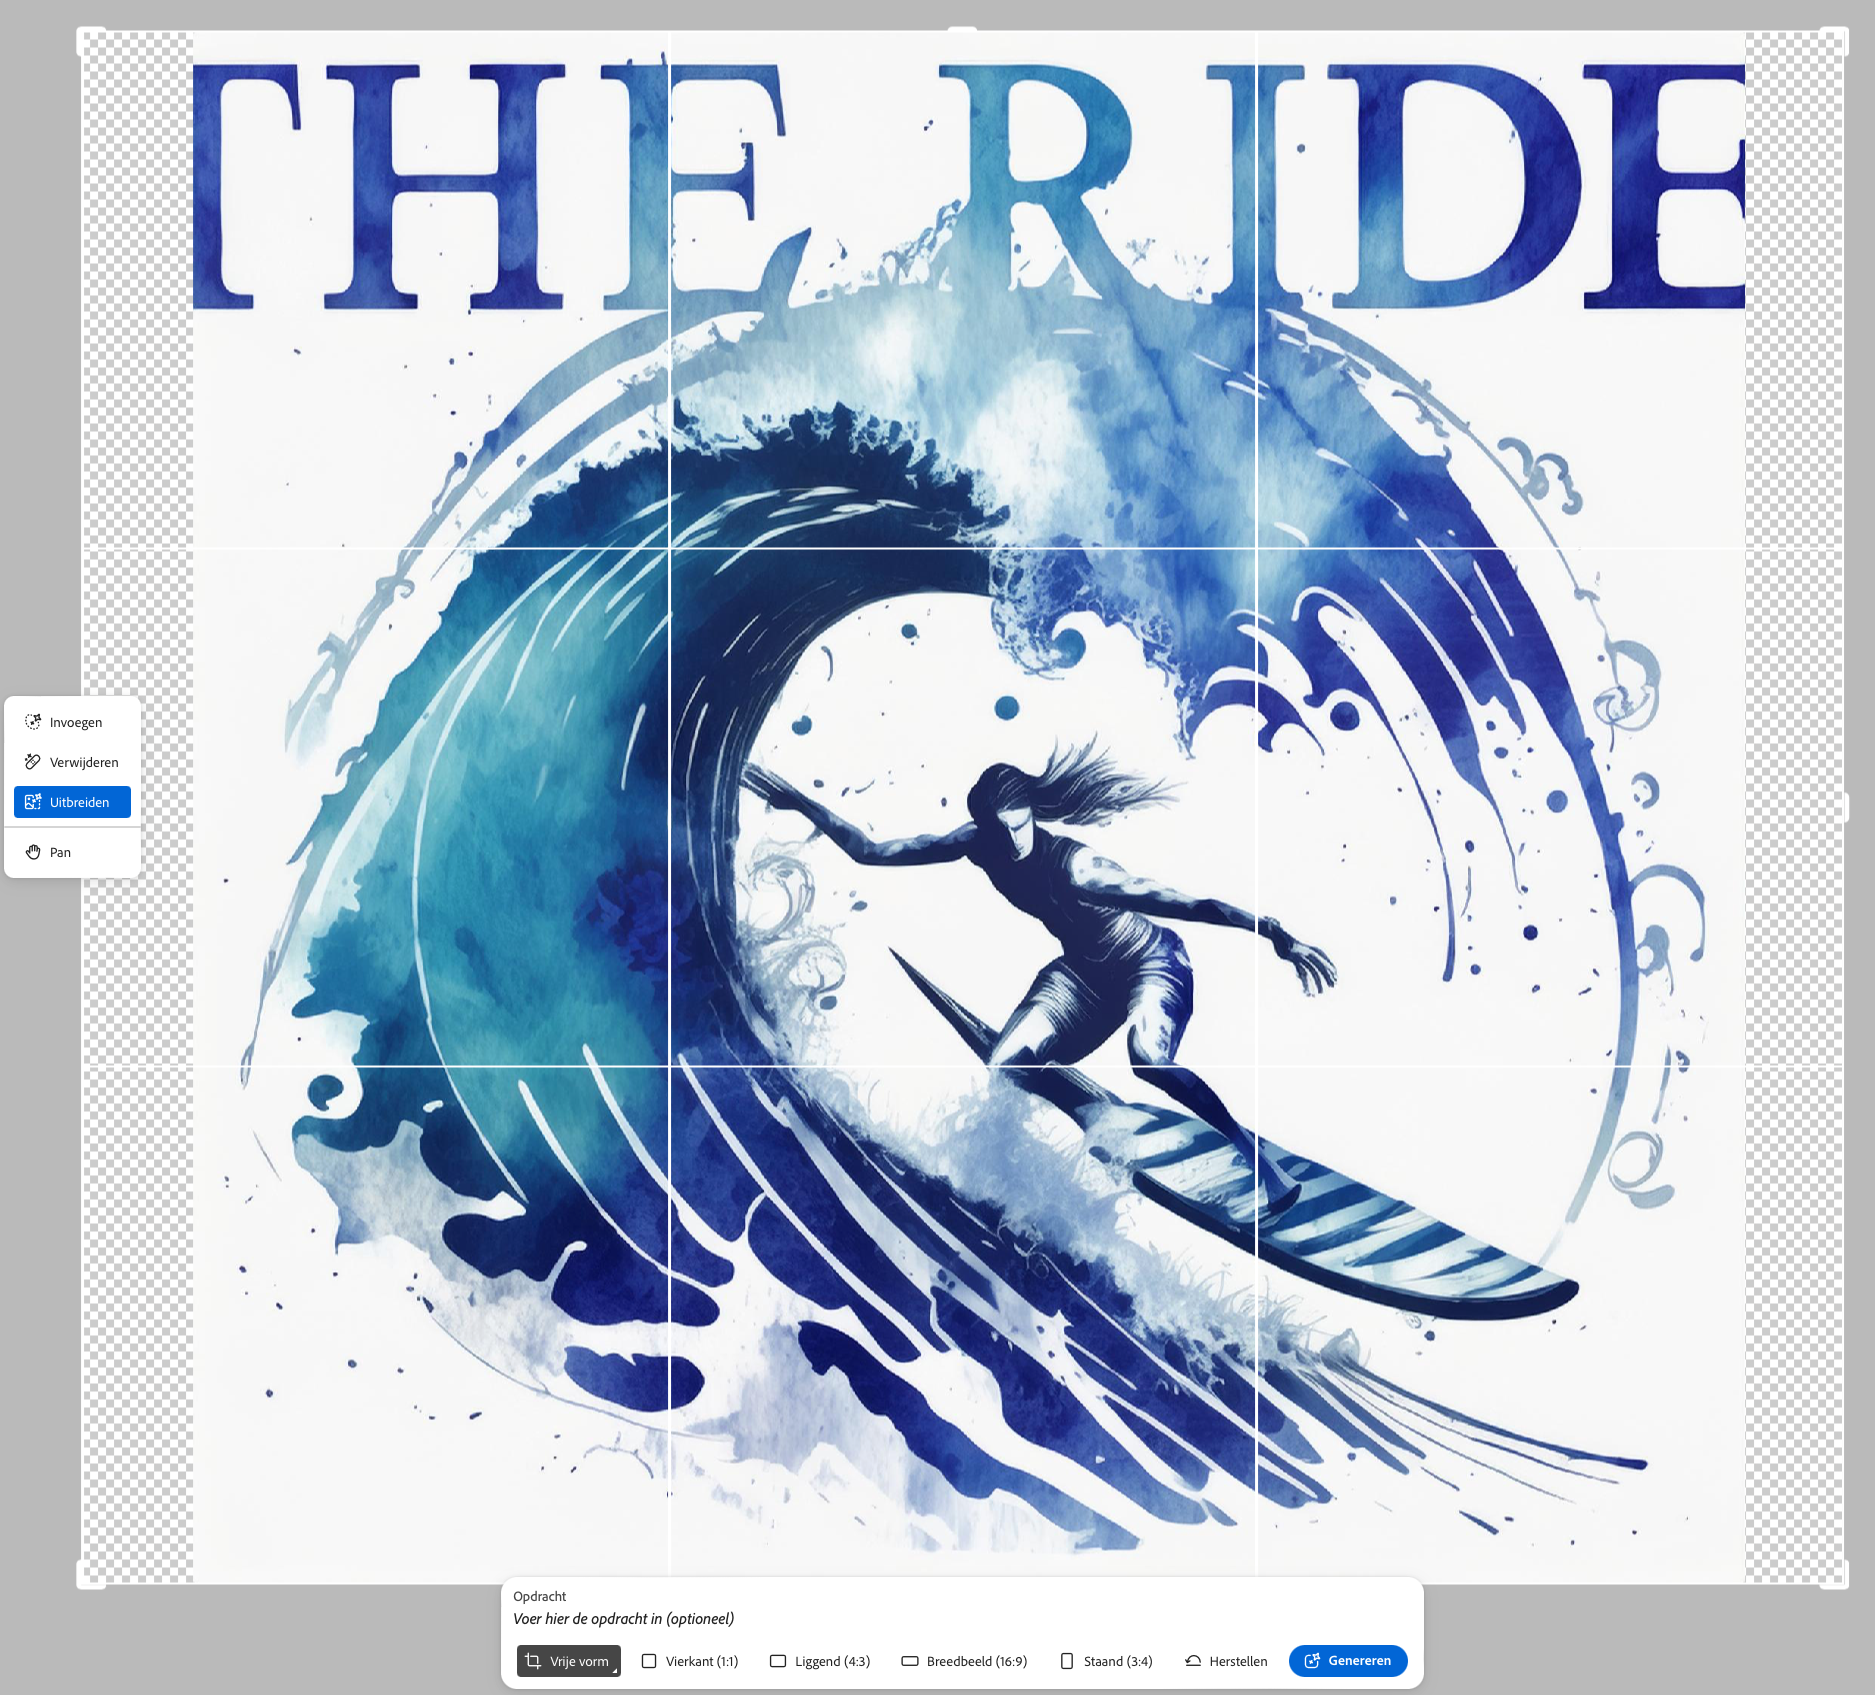
Step 12: Then click on the 'Generate' button in the bottom right corner. In this case, I am satisfied with one of the three options, so I click on the 'Keep' button.
Step 13: Don't forget to click the 'Download' button at the top to download the final result to your computer.

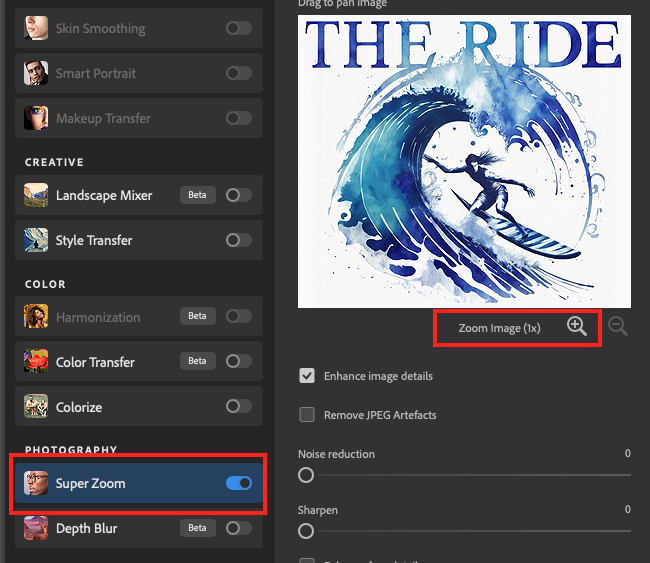
Do you want the photo in even higher quality? This quality is good enough to enlarge it in Photoshop. You can read more about it via the link below 'Upscalers'. But I will briefly reveal the steps.
_________________________________________________
In deze oefening gaan wij een artwork gebruiken die ik ooit zélf heb gemaakt. Sprake van plagiaat is er daarom niet want het artwork is van mij en ik geef jullie toestemming om er mee te doen wat je wilt. Sterker nog, hieronder plaats ik het originele Adobe Illustrator artwork die je mag downloaden en mag bekijken, bewerken of wat dan ook met Adobe Illustrator (maar dat is nu niet de oefening).
![]()
De Illustrator tekening hoef je voor deze oefening niet te downloaden. Het is meer voor jezelf als je het leuk vindt om het origineel in Illustrator te kunnen bekijken / bewerken.
Stap 1:
Klik op het blauwe JPG plaatje hier onder om het JPG oefendocument te downloaden.
Dit plaatje heb ik expres in lage kwaliteit opgeslagen alsof je dit bijvoorbeeld gevonden hebt met 'Google Images'.
Stap 2: Ga naar https://firefly.adobe.com.
Stap 3: Wanneer je op deze website bent dien je meteen een prompt in te voeren. Voer de volgende prompt in en klik op 'Genereren':
Blauw witte illustratie van een surfer op een golf met daar boven de tekst 'The Ride'.
Stap 4: Het eerste resultaat is nog niet het eindresultaat. Je bent nu in de werkruimte waar je de dingen kan doen die nodig zijn om te krijgen wat je wél wilt.
Wanneer ik een paar stappen verder ben, dan heb ik het verschil tussen 'vierkant' en 'breedbeeld' ervaren en ik leg eerst even uit waarom je in dit geval 'Vierkant' moet kiezen in plaats van 'Breedbeeld'.
De resultaten wanneer je vierkant of breedbeeld kiest zijn signifikant verschillend. Óók in de zin hoe Firefly jouw opdracht interpreteert. Ik heb die meerdere malen getest met steeds ongeveer hetzelfde resultaat. Bij 'Vierkant' krijg ik wat ik wil namelijk dat de tekst 'THE RIDE' wél wordt gemaakt maar de tekst in de golf niet (want dat is te klein en dan worden het niet leesbare tekens).
Bij 'Breedbeeld' laat het de tekst 'The Ride' weg en gaat het juist tekst in de golf nabootsen, wat vervolgens niet goed lukt..
Stap 5: Zet 'Content Type' op 'Kunst'.
Stap 6: Nu komt een belangrijke. Compositie. Klik bij 'Compositie' op 'Afbeelding uploaden' en kies het JPG plaatje dat je aan het begin hebt gedownload.
Stap 7: Wil je het originele plaatje zo veel mogelijk benaderen? dan dien je het schuifje 'Sterkte' helemaal naar rechts te schuiven.
Stap 8: Bij Stijlen die je precies hetzelfde. Je upload hetzelfde plaatje en doet beide schuifjes helemaal naar rechts.
Stap 9: Het resultaat is telkens zodanig dat de tekst links en rechts is afgesneden. Firefly heeft er een handje van om een soort afgesneden 'close-up' te maken. Misschien bewust om plagiaat te voorkomen? Ik heb geen idee. Maar bij het maken van tassen bijvoorbeeld d.m.v. een refentie tekening gebeurd het ook steeds. Daar helpt het dan wel om bijvoorbeeld breedbeeld of staand te kiezen. Maar Firefly zou Firefly niet zijn als wij dit eenvoudig en snel opgelost hebben, dat gaan wij in de volgende stap doen.
Stap 10: Zoals je in Photoshop bij het gereedschap 'Uitsnijden' ook 'Generatief kan uitbreiden', kan dat ook in Firefly. Je hoef er niet voor naar Photoshop toe. De optie zit alleen verstop. Je dient namelijk eerst in de linker bovenhoek te klikken op 'Bewerken' en dan te kiezen voor 'Generatief vullen (voorvertoning)'.
Stap 11: Nu kan je links kiezen voor 'Uitbreiden'. Klik daar op en nu kan je links en rechts de randen iets naar buiten schuiven.
Stap 12: Klik daarna rechtsonder op de knop 'Genereren'. En in dit geval ben ik met één van de drie opties tevreden en daarom klik ik op de knop 'Behouden'.
Stap 13: Vergeet niet om bovenaan op de knop 'Downloaden' te klikken om het eindresultaat naar je computer te downloaden.
Wil je de foto in nóg hogere kwaliteit? Deze kwaliteit is goed genoeg om vervolgens in Photoshop te vergroten. Via de link hier onder 'Upscalers' lees je er meer over. Maar ik zal in het kort de stappen verklappen.
 Klik hier voor Nederlands