![]()

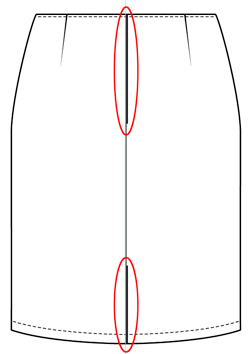
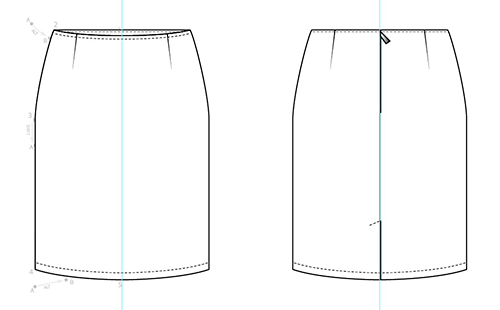
In this tutorial you learn to draw a basic straight skirt.
![]()
This video takes 9 minutes.
Step 1: Click on the yellow 'Ai' icon to download the exercise document and open it in Illustrator.
Step 2: Activate the 'Zoom Tool'  (z) .
(z) .
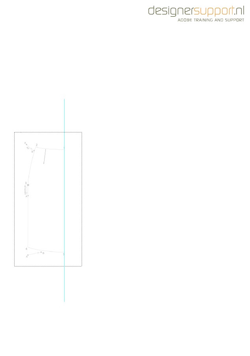 Step 3: Click and drag a 'marquee' around the skirt to zoom in to the skirt.
 Step 4: Go on top of the screen to 'View' and see if 'Smart Guides' is active. If not, click on it.
Step 5: Activate the 'Pen Tool'  (v).
(v).
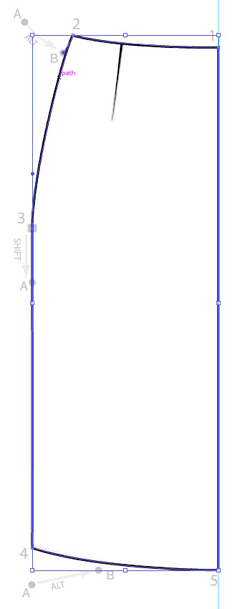
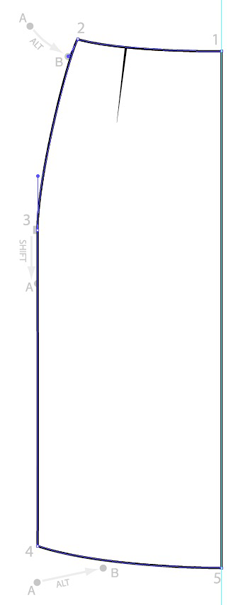
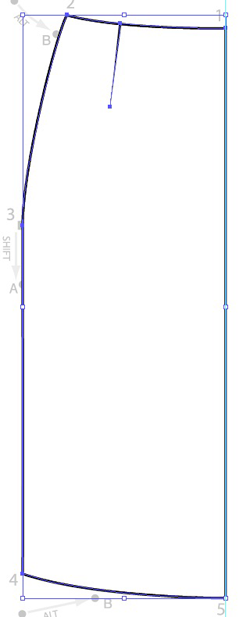
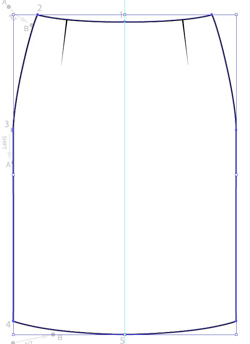
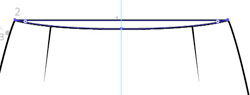
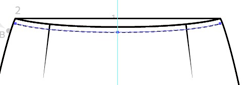
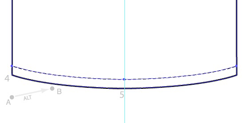
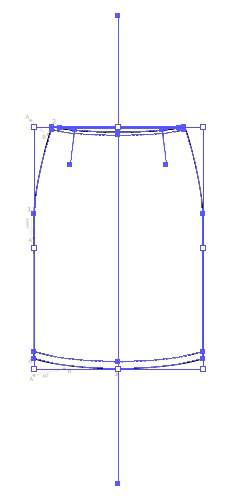
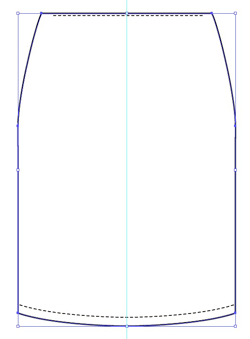
 Step 6: Click exactly on the center guide at '1'.
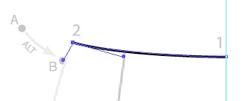
Step 7: Click at 2 and drag a 'handle' to the dot at 'A'
DO NOT RELEASE THE MOUSE YET.
Step 8: Press 'alt' and drag the handle to the dot at 'B'.
FIRST RELEASE THE MOUSE, THEN 'ALT'.
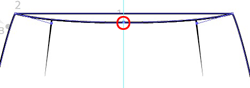
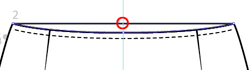
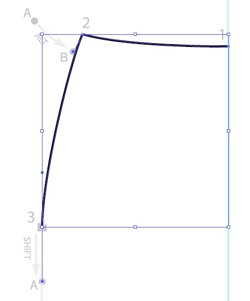 Step 9: Click on the box at '3' and drag a handle to 'A'.
WHILE YOU DRAG, PRESS AND HOLD 'SHIFT'.
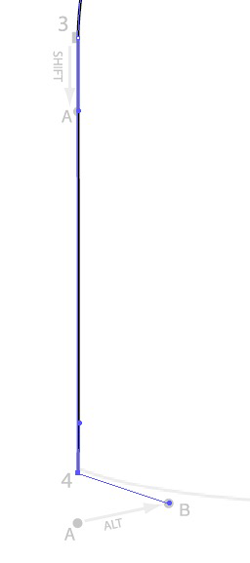 Step 10: Click at '4' and drag a handle to 'A'.
DO NOT RELEASE THE MOUSE YET.
Step 11: Press 'alt' and drag the handle to the dot at 'B'.
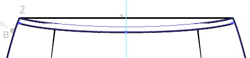
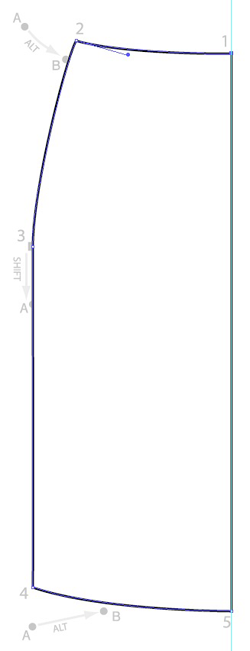 Step 11: Click at '5'. Be sure that you click exactly on the center guide.
Step 12: Close the path by clicking on the anchor point where you started at '1'.
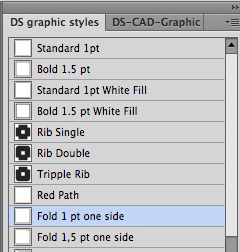
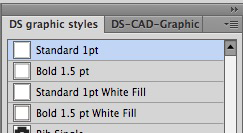
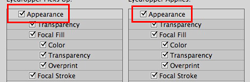
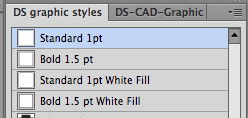 Step 13: Inside the panel called 'DS graphic styles' click on 'Standard 1pt'.
Or when you did not install our libraries, remove the fill color manually.
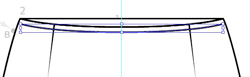
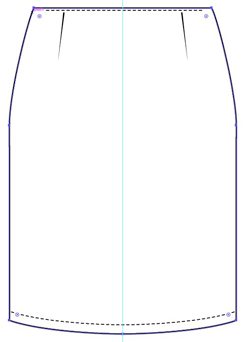
Step 14: Activate the 'Line Segment Tool'  (\).
(\).
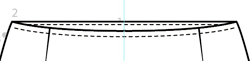
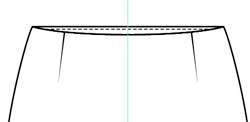
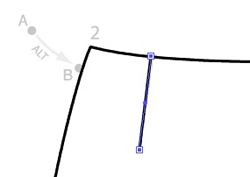 Step 15: Click on the top path and drag a seam as per sample.
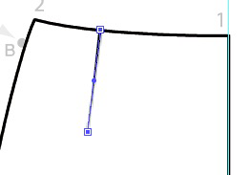 Step 16: Inside the panel 'DS graphic styles', click on 'Fold 1pt one side'.
Step 17: Activate the 'Selection Tool'  (v).
(v).
 Step 18: Click on the path of the skirt to select it.
 Step 19: Inside the panel called 'DS graphic styles' click on 'Standard 1pt White Fill'.
 Step 20: Press and hold 'shift'. Click on the seam to add it to the selection.
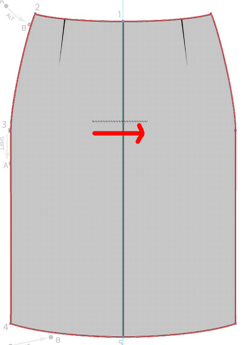
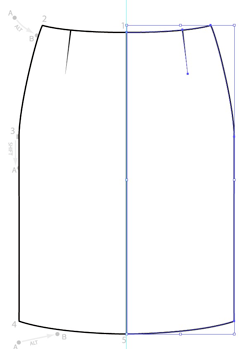 Step 21: To reflect the selection to the right:
 and choose the 'Reflect Tool'
  (o).
(o).
 Step 22: Activate the 'Selection Tool' (v) and click on the path of the left part to select it.
Step 23: Press and hold 'shift' and click on the path of the right part to add it to the selection.
Step 24: Activate the 'Shape Builder Tool'  (shift-m).
 Step 25: Move the mouse / pen on top of the left part, then click and drag right over the center line.
This will eat up this center line and makes one shape from the left and right paths.
____________________________________
Sometimes, the line in the center does NOT disappear. This happens when the paths in the center are not exactly on the center guide. Carrie out the five steps below.
 (a).
(a). 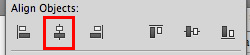
____________________________________
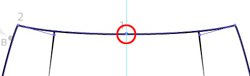 Step 26: Activate the 'Direct Selection Tool' (a).
Step 27: Click on the center top anchor point.
Step 28: Press 'F2' to create a clone of the selected part of the path.
When the 'DS Action' function keys are not installed:
Press 'Ctrl-C' following by 'Ctrl-F'.
 Step 29: Go to 'Object > Path > Join' 'Ctrl-j'. This will close the path joining the left and right anchor points with each other.
 Step 30: Click on the same anchor point again.
Step 31: Press 'F2' to create a clone of the selected part of the path.
When the 'DS Action' function keys are not installed:
Press 'Ctrl-C' following by 'Ctrl-F'.
 Step 32: Use the 'down arrow key' on your keyboard to move the cloned path a bit downwards.
 Step 33: Inside the panel 'DS graphic styles', click on 'Standard 1pt' to remove the white fill.
Or manually remove the white fill...
 Step 34: Inside the panel 'DS Brushes' click on 'Single stitch'.
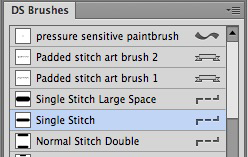
 Step 35: Click on the top path.
Step 36: Press 'F2' to create a clone of the selected part of the path.
When the 'DS Action' function keys are not installed:
Press 'Ctrl-C' following by 'Ctrl-F'.
 Step 37: Use the 'down arrow key' on your keyboard to move the cloned path a bit downwards.
 Step 38: Activate the 'Eyedropper Tool'
  (i) and click on the other stitching path.This will sample the path settings (stitching in this case) to the selected path.
This will only work when you changed the settings for the Eyedropper Tool! So if it did not work? Follow the three steps below.
Step 39: Activate the 'Direct Selection Tool' (a).
Step 40: Move the anchor points from the path a bit inside to fit the stitching.
 Step 41: You figure out how to create the hem stichting :-).
Step 42: Activate the 'Selection Tool' (v).
Step 43: Click next to the drawing to deselect 'ctrl-shift-a'.
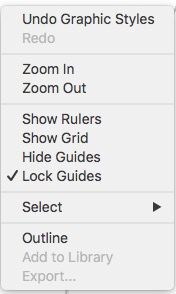
Step 44: Right click on the page and uncheck 'Lock Guides'. If there is no check in front of 'Lock Guides', do nothing.
 Step 45: Select the whole skirt (the center guide should be selected as well).
 Step 46: Start moving the skirt to the right. Then press and hold 'alt' and 'shift' and drag the skirt next to the other skirt. Release the mouse first and then 'alt' and 'shift'.
Step 47: Deselect (ctrl-shift-a).
Step 48: Right click on the artboard and click on 'Lock Guides' to lock the guides.
 Step 49: Delete the front stitching.
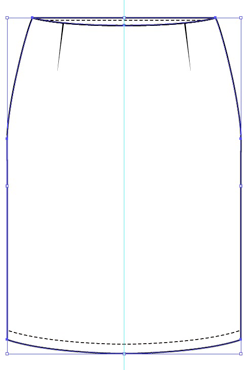 Step 50: Press and hold 'shift', then click on the path of the skirt and click on the top path to select both paths.
Step 51: Activate the 'Shape Builder Tool' (shift-m).
 Step 52: Move the mouse / pen on top of the skirt, then click and drag over the front waist line.
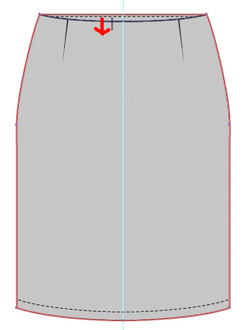
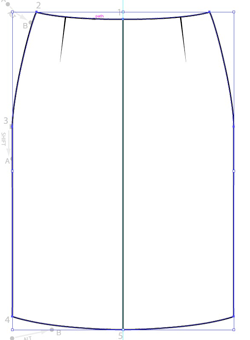
 Step 53: Go on top of the screen to 'Object > Arrange > Send to Back'.
Activate the 'Direct Selection Tool' (a).
 Step 54: Fix the length of the stichting path and the two seams.
Step 55: Activate the 'Line Segment Tool' (\).
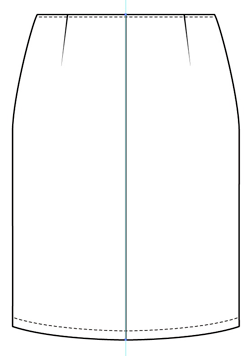 Step 56: Press and hold 'shift', then click and drag exactly over the center of the skirt.
 Step 57: Drag another two paths just next to the center path. The top path is a bit longer than the bottom one.
 Step 58: Click and drag another path for the stichting of the split.
Step 59: Activate the 'Eyedropper Tool' (i).
Step 60: Click on the hem stitching.
Step 61: Activate the 'Pen Tool' (v).
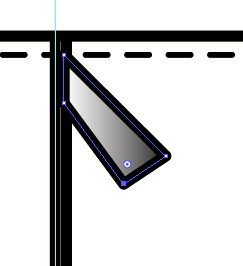 Step 62: Draw four anchor points to create a puller.
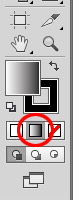
Step 63: Left, under the Tools panel, click on the 'Gradient' button.
Step 64: Press 'Ctrl - 0'
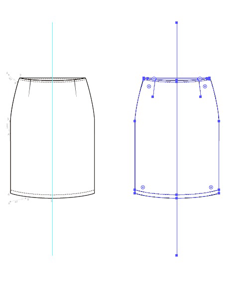
CONGRATULATIONS, YOU JUST FINISHED YOUR FIRST SKIRT
_____________________________________________________________
![]()
In deze tutorials ga je leren om een basis rok te tekenen.
![]()
Deze video duurt 9 minuten.
Stap 1: Klik op het gele 'Ai' icoontje om het oefendocument te downloaden en te openen in Illustrator.
Stap 2: Activeer het gereedschap 'Zoom' (z) .
Stap 3: Klik en sleep een rechthoek over de rok om hier naartoe in te zoomen.
Stap 4: Ga bovenaan het Illustrator scherm naar 'Weergave' en kijk of er een vinkje staat voor 'Slimme Hulplijnen'. Zo niet, klik op 'Slimme Hulplijnen'.
Stap 5: Activeer het gereedschap 'Pen' (v).
Stap 6: Klik precies op de middenlijn bij '1'.
Stap 7: Klik bij 2 op het hoekpunt, houd de muis ingedrukt en sleep een 'hendel' naar het punt bij 'A'.
LAAT DE MUIS NOG NIET LOS!
Stap 8: Houdt 'alt' ingedrukt en sleep de hendel naar het punt bij 'B'.
LAAT EERST DE MUIS LOS, DAN 'ALT'.
Stap 9: Klik op het vierkantje bij '3' houdt de muis ingedrukt en sleep een hendel naar 'A'.
TERWIJL JE SLEEPT, HOUDT 'SHIFT' INGEDRUKT.
Stap 10: Klik bij '4' en sleep een hendel naar 'A'.
HOUDT DE MUISKNOP NOG STEEDS INGEDRUKT.
Stap 11: Druk op 'alt' en sleep een hendel naar 'B'.
Stap 11: Klik bij '5'. Zorg dat je exact op de midden lijn klikt.
Stap 12: Sluit het pad door op het ankerpunt te klikken waar je mee bent gestart bij '1'.
Stap 13: Klik in het deelvenster 'DS graphic styles' op 'Standard 1pt'.
Of wanneer je deze bibliotheek niet hebt, haal de witte vulling handmatig weg.
Stap 14: Activeer het gereedschap 'Lijnsegment' (\).
Stap 15: Klik op het bovenste pad en sleep een lijn zoals het voorbeeld (figuurnaad).
Stap 16: Klik in het deelvenster 'DS graphic styles', op 'Fold 1pt one side'.
Stap 17: Activeer het gereedschap 'Selecteren' (v).
Stap 18: Klik op het pad van de rok om het te selecteren.
Stap 19: Klik in het deelvenster 'DS graphic styles' op 'Standard 1pt White Fill'.
Als je deze bibliotheek niet hebt, dan geef je het pad handmatig een witte vulling.
Stap 20: Houdt 'shift' ingedrukt. Klik op de figuurnaad om het aan de selectie toe te voegen.
Stap 21: Om het linkerdeel naar rechts te spiegelen:
(o).
Stap 22: Activeer het gereedschap 'Selecteren' (v) en klik op het pad van het linker deel om het te selecteren.
Stap 23: Houdt 'shift' ingedrukt en klik op het pad van het rechter deel om het aan de selectie toe te voegen.
Stap 24: Activeer het gereedschap 'Vormen maken' (shift-m).
Stap 25: Beweeg de muis boven het linkerdeel van de rok, houdt dan de muis ingedrukt en sleep de muis over de middenlijn.
Dit verwijderd de zwarte lijn in het midden en smelt de twee delen aan elkaar.
____________________________________
Dit kan gebeuren als bij het tekenen van het linker deel de zwarte lijn op de middenlijn daar niet exact bovenop ligt. Er is dan zeg maar een 'kiertje' tussen het linker en het rechter deel. In dat geval volg je de onderstaande punten.
(a).
____________________________________
Stap 26: Activeer het gereedschap 'Direct selecteren' (a).
Stap 27: Klik op het middelste ankerpunt van de bovenlijn.
Stap 28: Druk op 'F2' om een kopie te maken van deze bovenste lijn.
Wanneer je de 'DS Actions' funktietoetsen niet hebt geinstsalleerd:
Druk op 'Ctrl-C' (kopieren) opvolgend door 'Ctrl-F' (op dezelfde plek een kopie terugplakken).
Stap 29: Ga bovenaan Illustrator naar 'Object > Pad > Verbinden' 'Ctrl-j'. Deze actie 'Verbinden' zal het linker ankerpunt en het rechter ankerpunt van de lijn met elkaar verbinden. Nu is het een gesloten pad geworden die je later een kleurvulling kan geven.
Stap 30: Klik nogmaals op hetzelfde ankerpunt.
Stap 31: Druk op 'F2' om een kopie te maken van deze lijn.
Wanneer je de 'DS Actions' funktietoetsen niet hebt geinstsalleerd:
Druk op 'Ctrl-C' (kopieren) opvolgend door 'Ctrl-F' (op dezelfde plek een kopie terugplakken).
Stap 32: Gebruik de toets 'pijltje omlaag' op je toetsenbord' om de gekopieerde lijn een stukje omlaag te verplaatsen .
Met de pijltoetsen iets naar beneden verplaatsen i.p.v. met de muis voorkomt dat je naar links of rechts verplaatst.
Stap 33: Klik in het deelvenster 'DS graphic styles', op 'Standard 1pt' om de witte vulling te verwijderen.
Of verwijder de witte vulling handmatig...
Stap 34: Klik in het deelvenster 'DS Brushes' op 'Single stitch'.
Als je deze bibliotheek niet hebt, dan open je het deelvenster 'Lijn' en maak je handmatig een stippellijn.
Stap 35: Klik op het pad.
Stap 36: Druk op 'F2' om een kopie te maken van deze lijn.
Wanneer je de 'DS Actions' funktietoetsen niet hebt geinstsalleerd:
Druk op 'Ctrl-C' (kopieren) opvolgend door 'Ctrl-F' (op dezelfde plek een kopie terugplakken).
Stap 37: Gebruik de toets 'pijltje omlaag' op je toetsenbord' om de gekopieerde lijn een stukje omlaag te verplaatsen .
Stap 38: Activeer het gereedschap 'Pipet' (i) en klik op de andere stiksellijn. Dit wil de lijninstellingen van deze stiksellijn kopieren naar de lijn die je nu geselecteerd hebt.
Dit kopieren van een stiksellijn werkt 'alleen' als je zelf de instellingen van het gereedschap 'Pipet' hebt aangepast. Heb je dat nog niet gedaan? Volg de punten hieronder om dat te doen.
Stap 39: Activeer het gereedschap 'Direct selecteren' (a).
Step 40: Verschuif de uitstekende ankerpunten een beetje naar binnen zodat de stiksellijn mooi past binnen de rok.
Stap 41: Nu mag jij zelf uitvogelen hoe je onderaan een stiksellijn maakt :-). Probeer uiteraard dezelfde stappen te volgen.
Stap 42: Activeer het gereedschap 'Selecteren' (v).
Stap 43: Klik naast de tekening of voer de sneltoets 'ctrl-shift-a' uit om te 'deselecteren'.
Stap 44: Klik met de rechter muisknop op de pagina en als er een vinkje staat voor 'Hulplijnen vergrendelen', klik er dan op om deze te 'de-activeren'. Staat er géén vinkje voor? Klik dan gewoon weer in het witte deel van de tekening.
Stap 45: Selecteer de gehele rok (als het goed is, dan selecteer je ook de midden hulplijn).
Stap 46: Beweeg de rok naar rechts (niet loslaten). Tijdens het slepen ga je 'alt' en 'shift' ingedrukt houden. Sleep de rok er netjes naast. Laat dan eerst de muis los, dan pas de toetsen.
Stap 47: Deselecteer (ctrl-shift-a).
Stap 48: Klik met rechts op het tekengebied en klik weer op 'Hulplijnen vergrendelen'.
Stap 49: Verwijder de twee figuurnaden.
Stap 50: Houdt 'Shift' ingedrukt, klik dan op de buitenlijn van de rok, klik nu ook op de bovenlijn binnenin de rok om die toe te voegen aan de selectie.
Stap 51: Activeer het gereedschap 'Vormen maken' (shift-m).
Stap 52: Beweeg boven de binnenkant van de rok (bovenaan), klik dan en sleep over de lijn naar beneden.
Stap 53: Ga bovenaan Illustrator naar 'Object > Ordenen > Naar achtergrond brengen'.
Activeer het gereedschap 'Direct selecteren' (a).
Stap 54: Pas de lengte aan van de figuurnaden zodat ze weer passen tegen de bovenlijn aan.
Stap 55: Activeer het gereedschap 'Lijnsegment' (\).
Stap 56: Houdt 'shift' ingedrukt, klik dan bovenaan de rok in het midden en sleep een lijn recht naar beneden naar de onderkant van de rok. Je hebt nu een midden achter naad getekend.
Stap 57: Teken midden bovenaan en onder een kortere vertikale lijn een klein beetje naast de midden naad. Dit suggereert de ritssluiting en de split.
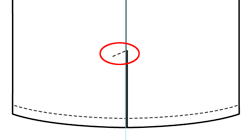
Stap 58: Klik en sleep vanaf de top van de split een diagonaal lijntje.
Stap 59: Activeer het gereedschap 'Pipet' (i).
Stap 60: Klik het de zoom stiksellijn.
Stap 61: Activeer het gereedschap 'Pen' (v).
Stap 62: Teken vier ankperunten om een puller te suggereren.
Stap 63: Links onder het deelvenster 'Gereedschappen', klik het het 'kleurverloop' icoontje.
Stap 64: Doe 'Ctrl - 0'
GEFELICITEERD, JE HEBT NET JOUW EERSTE ROK AFGEROND