![]()

This tutorials shows you how to develop a new shape by moving and or rotate parts of the shape. A few examples are demonstrated that you can try. When you finished the tutorial, you can continue creating new shapes on your own. Let your creativity run free moving and rotating shapes.
![]()
Step 1: Click on the yellow 'Ai' icon to download the exercise document and open it in Illustrator.

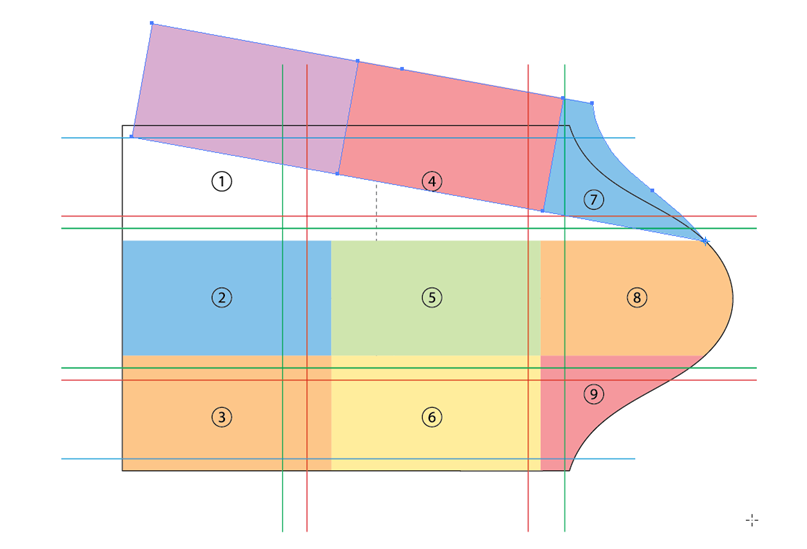
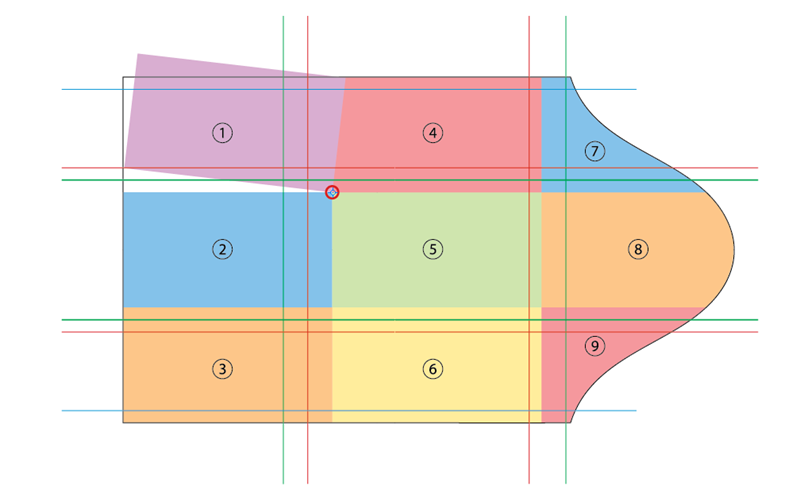
The drawing is divided in nine color shapes. And there are paths to help you move and rotate the shapes to.
For a better view:
Go to 'View' and check if 'Smart Guides' is active. If not, click on it to activate (ctrl-u). This will give you more control.
Step 2: Activate the "Group Selection Tool" 
(Q).
Step 3: Select multiple shapes:
Step 4: Activate the "Rotate Tool"  (R).
(R).
Step 5: Rotate multiple shapes:
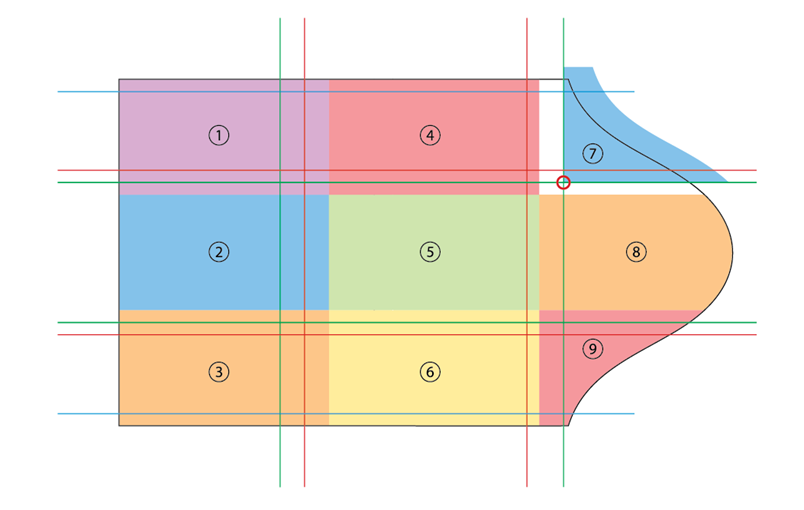
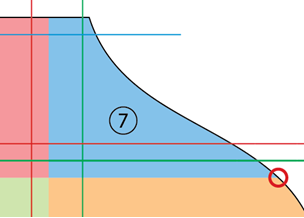 The blue shape at 7: Click on the right bottom anchor point and release the mouse.
 This is now the rotation point.
Step 6: Undo the last ration step (Ctrl-Z) and keep the shapes selected.

The selected shapes are back in it's original position.
Step 7: Rotate multiple shapes:
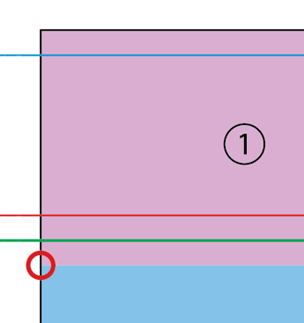 The lilac (pink) shape 1: Click on the left bottom anchor point at the corner of the shape and release the mouse.
 This is now the rotation point.
Step 8: Undo the last rotation (Ctrl-Z).
Step 9: Deselect (Ctrl-Shift-A).
Step 10: Activate the "Group Selection Tool" (Q).
Step 11: At 1: Click on the lilac (pink) shape to select it.
Step 12: Activate the "Rotate Tool" (R).
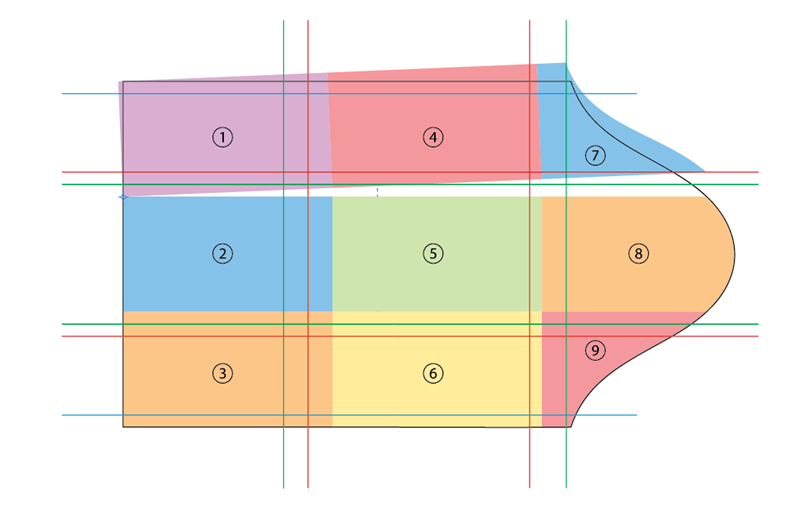
Step 13: Rotate the lilac (pink) shape:
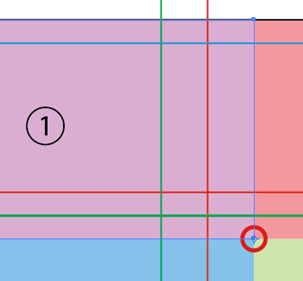 Click on the right bottom anchor point at the corner of the shape and release the mouse.
 This is now the rotation point.
The left bottom anchor point of the shape: Click on the anchor point and drag (rotate) upwards. Do not release the mouse yet.
Step 14: Undo the last rotation (Ctrl-Z).
Step 15: Activate the "Group Selection Tool" (Q).
Step 16: Select multiple shapes:
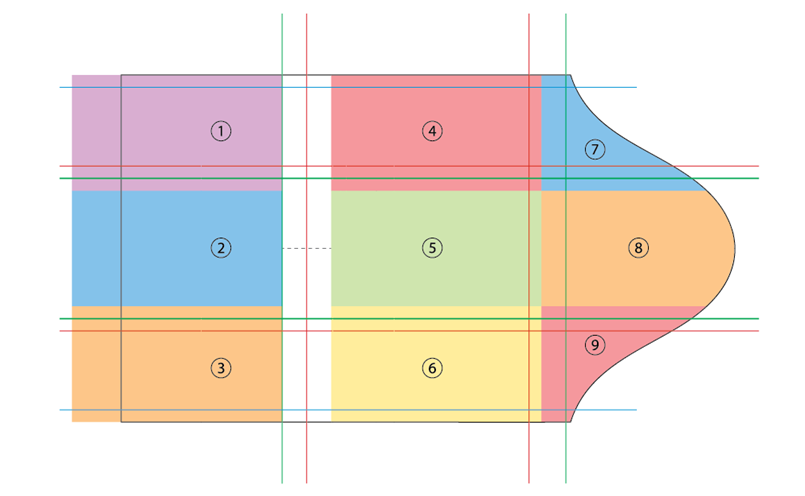
Step 17: Move the shapes:
Step 18: Undo the last move (Ctrl-Z).
Step 19: To move the blue shape:
Step 20: Undo the last move (Ctrl-Z).
Step 21: Deselect (Ctrl-Shift-A).
Step 22: Undo again (Ctrl-Z).
Now you can develop new shapes your self by moving and rotating shapes again. Or using a combination of both or repeating one of the previous steps. All corner points can be used to rotate or move shapes.
Succes and have fun creating new shapes!
____________________________________________________
![]() In deze tutorial wordt je uitgelegd hoe je een nieuwe vorm kan ontwikkelen door vlakken te verplaatsen en/of te roteren. Er worden een aantal voorbeelden gegeven die je kan uitproberen. Heb je deze tutorial doorlopen, dan kan je zelf aan de slag met het bedenken en ontwikkelen van nieuwe vormen. Laat je creativiteit de vrije loop bij het verplaatsen en/of roteren van vlakken.
In deze tutorial wordt je uitgelegd hoe je een nieuwe vorm kan ontwikkelen door vlakken te verplaatsen en/of te roteren. Er worden een aantal voorbeelden gegeven die je kan uitproberen. Heb je deze tutorial doorlopen, dan kan je zelf aan de slag met het bedenken en ontwikkelen van nieuwe vormen. Laat je creativiteit de vrije loop bij het verplaatsen en/of roteren van vlakken.
![]()
Stap 1: Klik op het gele 'ai' icoontje om het Illustrator document "Shape-Design.ai" te downloaden en te openen in Illustrator.
De tekening is onderverdeeld in negen kleurvlakken. En er zijn lijnen die jou helpen om de ingekleurde vlakken naar toe te verplaatsen of naar toe uit te draaien.
Wil je het beter kunnen zien:
Controleer of in het menu "Weergave" in de bovenbalk "Slimme hulplijnen" is aangevinkt. Met deze functie geactiveerd heb je een controle over meerdere handelingen die je hierna gaat verrichten.
Stap 2: Activate the "Group Selection Tool" (Q).
Stap 3: Meerdere vlakken selecteren:
Stap 4: Druk op de 'R' om het gereedschap "Roteren" te activeren.
Stap 5: Meerdere vlakken roteren:
Het blauwe vlak bij 7: Klik op het rechts onder ankerpunt op het hoekpunt van het vlak en laat de muis weer los.Dit is nu het rotatie punt.
Stap 6: Maak de laatste bewerking ongedaan door (Ctrl-Z) in te drukken en laat de vlakken geselecteerd.
De geselecteerde vlakken staan nu weer in de oorspronkelijke positie.
Stap 7: Meerdere vlakken roteren:
Het lila vlak bij 1: Klik op het links onder ankerpunt op het hoekpunt van het vlak en laat de muis weer los.Dit is nu het rotatie punt.
Stap 8: Maak de laatste bewerking ongedaan door (Ctrl-Z) in te drukken.
Stap 9: Deselecteer (Ctrl-Shift-A).
Stap 10: Druk op de 'Q' om het gereedschap "Groep selecteren" ![]() .
.
Stap 11: Bij 1: Klik op het lila vlak om te selecteren.
Stap 12: Druk op de 'R' om het gereedschap "Roteren" te activeren.
Stap 13: Het lila vlak roteren:
Klik op het rechts onder ankerpunt op het hoekpunt van het vlak en laat de muis weer los.Dit is nu het rotatie punt.
Stap 14: Maak de laatste bewerking ongedaan door (Ctrl-Z) in te drukken.
Stap 15: Druk op de 'Q' om het gereedschap "Groep selecteren" ![]() .
.
Stap 16: Meerdere vlakken selecteren:
Stap 17: Vlakken verplaatsen:
Stap 18: Maak de laatste bewerking ongedaan door (Ctrl-Z) in te drukken.
Stap 19: Het blauwe vlak verplaatsen:
Stap 20: Maak de laatste bewerking ongedaan door (Ctrl-Z) in te drukken.
Stap 21: Deselecteer (Ctrl-Shift-A).
Stap 22: Maak de laatste bewerking ongedaan door (Ctrl-Z) in te drukken.
Ga nu zelf aan de slag en ontwikkel nieuwe vormen door vlakken te verplaatsen of te roteren en eventueel nogmaals te verplaatsen en roteren. Of door een combinatie van beide te maken en/of een vorige handeling te herhalen.
Alle hoekpunten kunnen gebruikt worden om één of meerdere geselecteerde delen te roteren of verplaatsen.
Succes en veel tekenplezier!